Monday, February 28, 2011

Why Would a Climber Need a Knife?

It's not always super easy to find things to write about in this blog. So I often lurk on different websites looking for topics to write about.  This particular post on rockclimbing.com caught my attention:

I am a new climber-and I've seen many climbers carry knives. Many of them are really attached to them-and consider them their favorite tool. I've met climbers that have stories about their knives and talk about them like a companion. I was thinking I should invest in one-but would love to hear about your experiences or knife stories.

I'm hoping that it will help me with this decision.

This individual must have a strange local ethic.  I've never heard a climber talk about his knife like it was a companion.  No, instead I've heard climbers complain that their "harness knives" aren't sharp enough or to debate whether or not carrying such an item is even appropriate.

So there are two parts to this question.  First, what might a climber need a knife for.  And second, why is there even an argument about whether such a tool is appropriate.


Many of you have read the book or seen the movie, Touching the Void.  In that particular incident, two climbers found themselves caught in a tremendously dangerous situation.  One hung over a cornice, while the other held him on a rope in a precarious stance.  As the stance deteriorated and it appeared that both would die, the climber holding the rope decided to cut it...

Lucky he had a knife!

But this was an incredibly unusual situation.  In over two hundred years of climbing history, this has happened exactly one time.  So this isn't exactly why you need a knife with you.

No, instead you need a knife with you to deal with this:


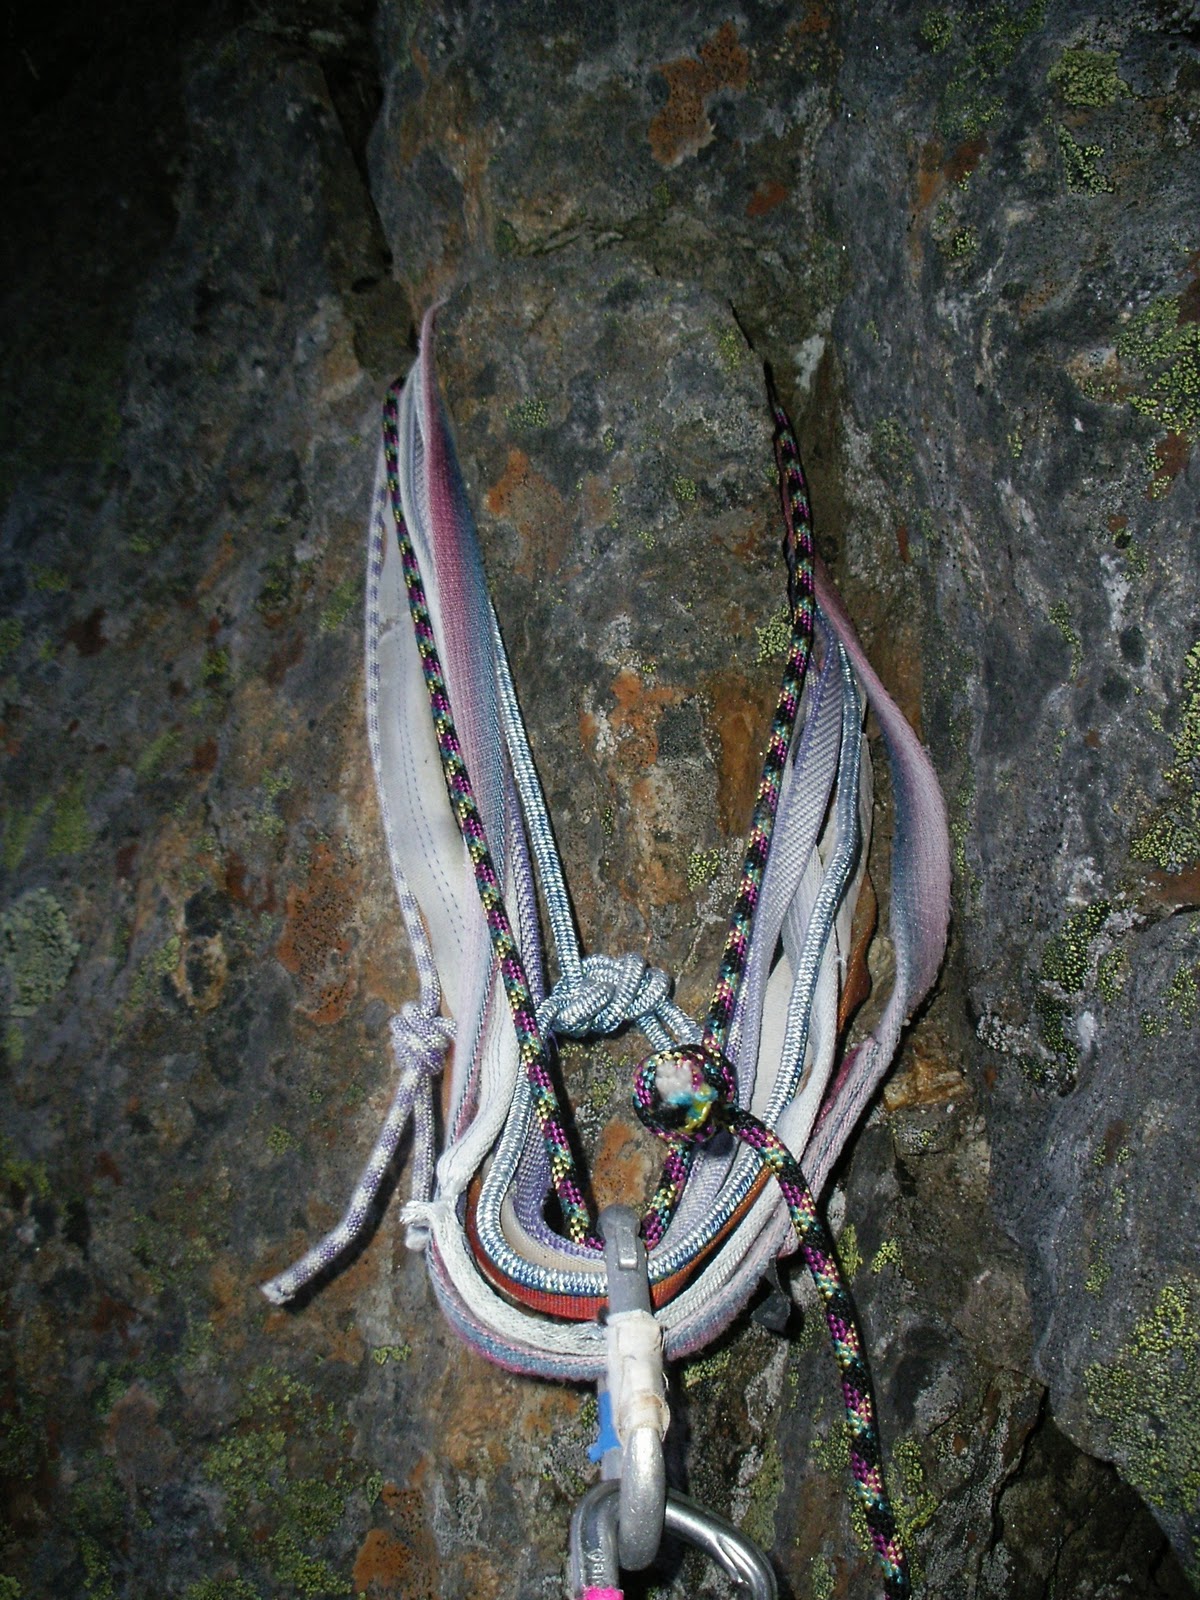
In the picture above, there are seven or eight slings wrapped around the rappel horn. Most of them are quite bad.  Some are crusty.  Some have been eaten by mice.  And so the best thing to do is to add one more cord, right?

Wrong.

The best thing to do is to add a cord (which you may need a knife to fashion) and then to cut the other tat away (which will also require a knife), so that there is one nice and clean redundant anchor on the horn.  Clearing away the garbage at rappel stations provides great stewardship and it shows that you care about the crags where you climb.

Cutting cords and sling material is a common occurrence on long multi-pitch routes that don't see a lot of traffic.  It is not at all uncommon to have to do some work to beef up anchors or to clean up old materials left years before.  Additionally, a knife could be used to cut away damaged sections of rope, be used in a first aid situation, or even be used to trim materials for a makeshift shelter.  There are a million uses for a knife, especially on long routes...

I alluded to the possibility that there was some controversy about carrying a knife.  That is not at all the case.  Every guide carries a knife.  No, instead the controversy lies in what kind of knife you should carry and  how you should carry it.

It is not uncommon for people to carry cheap "gas station" knives on cords hanging off their harnesses.  Indeed, some people even carry more expensive knives the same way.  The concern is that a knife might open and become dangerous, both from the possibility of getting cut as well as the possibility of it damaging gear.  As such, there are some guide trainers that don't allow guides to carry knives on their harnesses.  They prefer if they were in a pack.
There are a couple of popular harness knives available on the market that theoretically will not open on your harness.  The Trango Piranah Climbing Knife (pictured above) is a very small knife that takes up very little space on your harness.


The Trango Sharktool (pictured above) is a nice hybrid between a nut-tool and a knife.  It is a nice way to eliminate some of the extra baggage of the other knives described here.  In other words, you will only need to have one carabiner for both the knife and your nut-tool.


The Petzl Spatha (pictured above) is a tried and true classic.  I would say that I've seen this particular knife on more peoples harnesses than any of the others listed.

Certainly many climbers carry a multi-tool.  This is especially useful if you are on an expedition or on a big alpine climb.  Some will elect to carry their multi-tool on a harness, but most will stow it in a pack.

So to answer the original question, there are many uses for a knife.  But if you start to see your knife as a companion or a close friend, then you should seriously consider therapy...

Jason D. Martin

Sunday, February 27, 2011

March and April Climbing Events

-- March 3 -- Belmont, CA -- Planet Granite Climbing Comp Friction Series

-- March 12 -- Charleston, SC -- Palmetto Pump and USA Climbing Comp


Red Rock Rendezvous....Don't forget that there is a lot going on in Las Vegas in mid to late March. Following is a quick breakdown of everything that is happening:
-- March 26 -- San Marcos, TX -- Texas State Flash Fest Bouldering Comp

-- April 8 -- Sunnyvale, CA -- Planet Granite Climbing Comp

-- April 15 -- Seattle, WA -- NWAC Snowball Fundraiser 

--April 18 -- Ellensburg, WA -- Ropeless Rodeo, Central WA University Comp

Saturday, February 26, 2011

Weekend Warrior - Videos to get you STOKED!!

For those folks who don't live within a days drive of an ice climbing mecca such as Ouray, CO, Bozeman, MT, or Cody, WY, they have have to get their kicks elsewhere. Here's a few videos to get your brain turning if you're itching for some ice climbing, but can't spend a day driving. 


But then again, there's nothing quite like getting out in the winter to some beautiful frozen waterfalls. 


Have a great weekend! Throw in some figure fours just for the heck of it!

-Katy Pfannenstein
Program Coordinator

Friday, February 25, 2011

The Belay Backup

When should a person have a belay backup?

In the American Alpine Institute Single Pitch Instructor Course, this question comes up constantly.  When should I have someone back up my new belayer?  When can I let them belay without a backup?  And how should I back them up?

These are questions that exist throughout the climbing world. Many climbers who are not professional instructors regularly teach people to belay.  So these are not simply esoteric guide questions, but are real and fundamental questions that anyone who has ever taught someone how to belay must consider.

New climbers should always have a backup of some sort. The possibility of dropping someone is very real for the rank beginner and is often still a possibility for someone with a little bit of experience.

The answer to when a person should no longer need a backup belayer is twofold.  First, you should be comfortable with the fact that the person no longer needs a backup.  A second, and far more important consideration, is when the individual feels comfortable enough to belay without a backup.

It is not uncommon for climbers -- especially very young climbers -- to teach their friends to belay and then to give them a hard time when they show concern about the level of responsibility they have been given. This is a recipe for disaster.  One should never ignore or belittle a person's concerns about his or her belay skills.  Indeed, this is exactly the type of red flag that would lead a guide to continue employing a belay backup.

Belay Backup Techniques

There are a number of individuals out there that have their hearts in the right place by providing a belay backup, but are doing it very poorly.  Indeed, while putting together this blog, I found an instructional video that demonstrates poor belay backup technique.

It is unfortunately quite common for climbers to simply hold the rope to backup a belayer. This is often done in a lackadaisical manner (see photo below) and may not provide the appropriate amount of friction to adequately stop a fall if the belayer panics and lets go of the rope.

This is an example of a VERY BAD belay backup. Note that the backup 
belayer is not really holding the rope and that he is not in line with the device.
It is highly unlikely that he will be able to arrest a fall if the kid on the tree lets go. 

There are two simple techniques to back someone up who is on flat terrain. The first option is to give the belayer a hip belay. And the second option is to simply run the rope through a second device on the backup belayer.

Occasionally I work with kids. In such a setting I tend to add yet another piece of redundancy to the system.  I employ a backup belayer as well as a knot tyer.  In other words, I have a kid tie backup knots every six or eight feet.  This keeps a person occupied who would otherwise be a potential crag management hazard.  Admittedly, tying knots in the rope is overkill with adults and even with competent high school students.  But when it comes to middle school kids, the more activities they have the better...

If the belay is running through a GriGri or a Cinch, then it might be okay to have a slightly less radical approach to your backup belay.  It doesn't take much to arrest a fall in such a device.

If you are not on flat ground and a backup belayer can get below the belayer, it might be acceptable to simply hold the rope for a backup.  This is what is refered to as an inline belay backup.


An Inline Belay Backup

Another option that allows you to hold the rope is to create an inline redirect.  In other words, the belay rope runs from the belayers device, to a ground anchor and then back to the backup belayer.  In such a situation it is super easy for a backup belayer to arrest a fall by holding the rope.

A Backup Belay Running through a Redirect

Backup belays are an important part of the safety net for the beginner climber.  If you're new to climbing don't hesitate to ask for a backup.  And if you have the opportunity to teach someone how to belay, always always always employ a belay backup.  It could save someone's life!

--Jason D. Martin

Tuesday, February 22, 2011

The Pre-Climb Checklist

There is no doubt that the vast majority of accidents that take place in the mountains happen due to human error. Indeed, many climbers read accident reports looking for the human error, just so that they can say to themselves, "at least I won't make that mistake."

This is a very dangerous thing to think. Any of us can make a human error mistake anytime. As a result, we should do everything in our power to keep such a mistake from happening. Things to consider include, tying knots at the end of the rope before belaying or rappelling, using an autoblock for a rappel, wearing a helmet, etc. In this blog post, we will go through the steps required for a safe and fun climb.

A Climber in Joshua Tree
Photo by Ian McEleney

1) Anchor -- Is the anchor you built for the climb adequate? If you're top-roping, are there two opposite and opposed locking carabiners at the top? Are the pieces good? If you're using bolts, are the bolts good?

Does the belayer need to be tied into a bottom anchor? The default answer is, "yes." If the belayer is not tied into a bottom anchor, you should be able to articulate why.

2) Belayer -- Is the belayer's harness on correctly? Is it doubled-back? Is the belay device threaded properly? Are you using a locking carabiner on the belay device? Is the carabiner locked? Usually a visual check is not good enough to prove that a locker is locked. It's always good to give it a quick squeeze check. Is his helmet on properly? Does he have a nut tool to remove gear if he's going to follow?

3) Climber -- Is the climber's harness on correctly? Is it doubled-back? Is the belay device threaded properly? Is he tied-in properly? Is his figure-eight dressed and neat? If he is leading, does he have the rack? Is his helmet on properly?

4) System -- Is the system closed? In other words, have you made sure that the end of the rope is either tied directly into the belayer or that there is a knot at the end? Open systems are responsible for a large percentage of climbing injuries and fatalities.

5) Commands -- Are you both on the same page as far as commands are concerned? Many people use different variations of commands and it's not a good thing to get them mixed up.

6) Multi-Pitch -- Do you have the climbing topo? Do you have food, water and clothes for the day? What is the weather forecast? Do you have a second rope in case you need to descend in an emergency? Do you have extra cordage and sling material to leave behind? Do you have a strategy?

Climbing is a game with few rules. One of those few is to make sure that you are completely prepared for the situation at hand. Go through the check-list every time. It could save somebody's life...

--Jason D. Martin

Monday, February 21, 2011

Avalanche 1 Course - A Photo Essay

I took my Avalanche 1 course last year, but I never really used my new found skills the rest of that season. Turns out that a avalanche assessment is like a language - if you don't use it, you forget it.

This year, I decided to start skiing. My roommate found me a great deal on an AT set up...so I suppose I have a bit more incentive to know avalanche hazards and risks if I want to get out there. While I may not be the best skier (yet), or the best back country leader, at least now I know a good decision from a bad decision.

Fellow Program Coordinator Katy Pfannenstein and I snapped some pictures of our recent Avy 1 course. Enjoy!

 Classroom day.

Lining up for a pit-digging lecture. 

 Kurt explaining how flux lines of beacons work. 

 Setting up for a Rutsch Block test.

Determining size of grains.
Going through a companion rescue scenario. 

 More pit-diggin'.

- Dyan Padagas, Program Coordinator

Sunday, February 20, 2011

February and March Climbing Events

-- Feb 18 - 21 -- Cody, WY -- 13th Annual "Waterfall Ice" Fest 

-- Feb 25 - 28 -- Nelson, BC --  Kootenay Coldsmoke PowderFest

-- Feb 26 -- Seattle, WA -- AAC Annual Benefit and Awards Dinner

-- Feb 27 -- Seattle WA -- Royal Robbins Book Signing

-- March 3 -- Belmont, CA -- Planet Granite Climbing Comp Friction Series

-- March 12 -- Charleston, SC -- Palmetto Pump and USA Climbing Comp


Red Rock Rendezvous....Don't forget that there is a lot going on in Las Vegas in mid to late March. Following is a quick breakdown of everything that is happening:
 -- March 26 -- San Marcos, TX -- Texas State Flash Fest Bouldering Comp

Saturday, February 19, 2011

Weekend Warrior - Videos to get you STOKED!!

Thought you had climbing talent?  Check out the following videos of amazing wall climbing! 

Scaling Squirrel


Ninja Cat


Monkey Man


Enjoy the weekend!

-Katy Pfannenstein
Program Coordinator

Friday, February 18, 2011

Eye Protection on Long Expeditions

Anyone who has spent any time on a glacier when the sun is out, will tell you how fast their skin started to tan or burn.  The reflective nature of snow and ice greatly magnifies the suns power, and proper measures need to be taken to protect our skin and eyes from UV rays.  Putting on sunscreen and wearing sun glasses seems like basic common sense when the sun is out, however it is not as obvious when the clouds are overhead.  The fact is though, that even when the clouds are out, those damaging UV rays are still making their way through, and your chances of becoming snow blind or burning your skin is still high.  On long expeditions, the chance of you encountering bad weather and having to deal with variable conditions is almost a guarantee, and as such you should come prepared.

The author, rocking out his Spectron 4 shades in the bright light on Denali

This leaves you with a bit of a dilemma, seeing as sunglasses generally are made for when the sun is out, right?  Most sunglasses are just too dark to use when the clouds are out, making visibility even a bigger issue.  Julbo USA realizes this issue, and as such have created glacier glasses with much higher visible light transmission.  They use a lens system which range from Spectron 1 - 4, with the higher number eliminating more of the visible light.  They have even created a lens system, which they call Camel, that is photochromatic - meaning it transitions between two different lens categories depending on the amount of light available.


This feature however, can price some people out of these glasses, and personally, I choose another option anyway.  On long expeditions, I will bring 3 different sets of eye wear, for a variety of reason.  The first, is a pair of sunglasses that have Spectron 4 lenses, for those days that are bluebird and the sun is out shining.  The second pair, will have Spectron 3 lenses in it, and an anti-fog coating.  I tend to find that when I'm in a white out, there is a lot more heat and moisture and my glasses will fog up.  That is why it is most important to have an anti-fog coating on this pair.


The author, with his Spectron 3 glasses - preparing for when that fog rolls in.


My final pair, will be some goggles, with the highest visible light transmission possible.  If I have goggles on, it is probably because the weather is so terrible and the wind is blowing so hard, that I will need to be able to see as much as possible.  Smith Optics makes a great pair of lenses called the sensor mirror, which seem to increase contrast and really help with the flat light that can be found in a blizzard.

Smith goggles with the Sensor Mirror Lens.

The important thing to note, is that all of these glasses/lenses filter out 100% of UVA/UVB rays.  The amount of visible light that is transmitted is a completely different story, which is why you can still remain protected while altering your lens to the current conditions.  Additionally, you could very well get a pair of glasses with Spectron 3 lenses, and they would serve most all of your purposes.  I choose 3 pairs of eye protection because I like to have redundancy in this system.  If I, or someone else on my team, loses or breaks their glasses - there will be a back up pair.  I would rather carry the extra weight of a second pair of glasses, than go snow blind.

The author, covering up his skin and rocking a different pair of shades on the summit of Denali.

Let's not forget the most important reason to carry more than one pair of sunglasses however.  Sometimes it's nice to switch up your style while on the mountain!

--Andrew Yasso
Program & Expedition Coordinator

Tuesday, February 15, 2011

Water Containers in The Alpine

For many people, the BPA scare over water bottles really started making people question how they carry water in the backcountry.  Of course there is the hydration bladder, however for many climbers who spend their time in the alpine, the chance of the hose freezing is just too risky.  I have seen many homemade versions of a hydration bladder which greatly minimize the chances of the hose and/or other components freezing, but at the end of the day, a bottle with an insulated carrier is the safest method of containing water.


A hydration bladder with insulated hose and cold weather valve guard.
My personal choice has very little to do with the potential health risks regarding BPA water bottles.  I choose my bottle based on functionality and weight - seeing as these are two primary concerns in the alpine.  Fortunately, my choice also has me protected health wise, seeing as Nalgene's Ultralight series has been BPA free from the beginning!  I choose the wide-mouth 32oz. ultralight bottle for a number of reasons.

First of all, when melting snow I want an easy target to pour water into the container without spilling it - so small mouthed bottles are out.  Second of all, I like to drink fast, so the wide mouth enables this.  I do however, use a "splash guard," which helps me not spill all over, and also makes pouring much easier.

A water bottle with a splash guard, to help with pouring and drip free drinking.
The material the ultralight bottle is made out of is definitely more pliable than the "unbreakable" Nalgene bottles that most people use.  I actually prefer the pliability of the ultralight bottle because it allows me to pack it easier, and it also seems to distribute heat better.  On those cold nights on Denali, I like to boil up water and pour it into the bottle, and then throw it into my sleeping bag.  For whatever reason, the "unbreakable" style of Nalgene's always seem to burn me, whereas the ultralight bottles seem to maintain just the right temperature.

Depending on the length of the climb, I will generally pack one to two 32 oz. bottles and one 16 oz. bottle.  The wide-mouth, ultralight 16 oz. bottle (with the lid strap) from Nalgene seems to be the hardest one to find in stores, but it is by far the most convenient in my eyes.  I really like to have a small bottle to put in the top lid of my pack, so I have quick access to water without greatly altering the weight distribution.  Additionally, this makes the best alpine thermos, when combined with a lightweight neoprene cozy.

The best alpine thermos combination, a 16 oz. bottle and a neoprene cozy.
At the end of the night, as I'm enjoying a hot drink out of my 16 oz. wide-mouth ultralight Nalgene bottle with it's neoprene sleeve, and there is a nice warm 32 oz. wide-mouth bottle with a splash guard in it at the bottom of my sleeping bag, I think to myself, "Man, I wonder if I put enough product placement in this blog - maybe they should pay me?"

I don't work for Nalgene, but this is just the system that works for me.  Please, feel free to share your hydration system in the alpine with us!

--Andrew Yasso
Program & Expedition Coordinator

Monday, February 14, 2011

McDonalds and Bears in the Sierra

Okay, since I've had children, I have had the unfortunate experience of reacquainting myself with McDonalds. I mean honestly, how many outdoor and fitness oriented adults go to McDonalds and admit it...not very many.

But it's different when you have kids.  There aren't that many places to eat where you can take children and occupy them.  McDonalds has those play areas, which the kids absolutely love.  Seriously, I know that there are people in the restaurant industry out there that are reading this.  And for all of you, here's my million dollar idea that I'll give you for free.  Make a nice restaurant that adults in their thirties and forties would want to go to and hang out at...with a play area.

If you do this, you will make a mint. I'll come. And everybody else I know that are my age with kids would go there too!

In any case, McDonalds recently did something interesting.  They produced a television commercial where a couple of bears in the Sierra decide to go out to McDonalds for dinner.  They do this by attacking a car full of people eating McDonalds.  The bears tear the car apart to get at the food.

Check out the commercial below:


Clearly, the commercial is a little bit over the top.  But it was inspired by reality.  There is a significant problem with bears and cars in the Sierra.  Indeed, some bear cubs are actually taught to sniff out food in cars and then to break into them.  They know that if they see a cooler in the back of a car, that there is food in it.

If you are traveling, backpacking, hiking or climbing in the Sierra, it is very important to remove the cooler from your car and put it in a bearbox.  These are provided at most trailheads and in most public campgrounds.  If there no bearboxes, then make sure that it is out of site.

Additionally, it's not a bad idea to avoid eating in your car.  Especially, fragrant food. like McDonalds. There are stories about bears breaking into cars for as little as one french-fry or one energy bar wrapper.

When bears become problem bears and continually break into cars for food, they become known to the rangers.  And once they become known, they are usually put down.

The Sierra is a great place to adventure.  But if you want to make sure that a trip to the area is a positive experience from beginning to end, be sure your car is clean and that you've stored your food properly.  Bears are beautiful creatures...when they're not in your car.

--Jason D. Martin

Sunday, February 13, 2011

February and March Climbing Events

-- Feb 12-13 -- Alpental, WA -- VertFest sponsored by OR

-- Feb 12 -- Seattle, WA -- Northwest Collegiate Climbing Challenge (UW)

-- Feb 17 -- Seattle, WA -- Steph Abegg Speaker Event

-- Feb 18 - 21 -- Cody, WY -- 13th Annual "Waterfall Ice" Fest 

-- Feb 25 - 28 -- Nelson, BC --  Kootenay Coldsmoke PowderFest

-- Feb 26 -- Seattle, WA -- AAC Annual Benefit and Awards Dinner

-- March 3 -- Belmont, CA -- Planet Granite Climbing Comp Friction Series

-- March 12 -- Charleston, SC -- Palmetto Pump and USA Climbing Comp


Red Rock Rendezvous....Don't forget that there is a lot going on in Las Vegas in mid to late March. Following is a quick breakdown of everything that is happening:

Saturday, February 12, 2011

Weekend Warrior - Videos to get you STOKED!!

New Course from AAI for 2012 - EXTREME WINGSUIT BASE JUMPING! 

Ok, just kidding!  But it is pretty sweet nonetheless!  For now, will still be moving against gravity on our courses!


Have a great weekend!

-Katy Pfannenstein
Program Coordinator

Friday, February 11, 2011

Yosemite Frazil Ice

I wish that more National Parks took the time to create videos like the Yosemite Nature Notes Series.  This is a group of videos specifically about the natural beauty and wonder of the park.  Previously, we have featured one of these videos on rockfall in the Valley.

This particular video that we are posting today describes an interesting and beautiful phenomenon that takes place late in the winter and early in the spring every year.  This phenomenon is called frazil ice.


--Jason D. Martin

Tuesday, February 8, 2011

Regluing Your Skins

Yesterday, we talked about waxing skis and snowboards, which requires messing around with the base of your device of choice. Since we were already in the workbench mode, I thought that we might spend a little more time talking about something that deals with skis and snowboards and also requires some workbench time.

If you've got money to burn, then when the glue on your skins wears out you can just buy a new pair. But if you're like most of us and you don't have money to burn, then you'll probably be willing to spend a few hours trying to reglue your skins. And unlike waxing your skis, because of the fact that you will only have to do this once every few years, the likelihood of developing real proficiency at this task is low.

When searching for information on the internet about this process, I found that there weren't as many resources as you might think. The reality is that a lot of people don't reglue their skins because the process is not terribly fun and can be frustrating. Instead, they end up buying new skins.

With that in mind, you can enter the regluing process with a "what do you have to lose" mindset. If you screw it up, you'll just have to buy new skins anyway. So take your time and as the guy in the video shows, make sure that you have a beer cracked and ready to steady your nerves with another one waiting in the fridge...

To reapply glue to your skins, you will need the following materials:
  • Gold Label Glue
  • Scissors
  • Brown Paper Bags (about 3-4 medium sized bags should be enough)
  • Masking Tape
  • Old Credit card/Hotel Key
  • Iron
  • Newspapers
  • Old Skins with correlating skis.


In his blog, the individual who made this video has the following additional tips:

Step 1 Preparation
  1. Throw some newspapers down to protect against glue damage.
  2. Attach skin to ski upside down so the adhesive is facing outwards.
  3. Put newspaper between the skin and ski to protect the ski from glue.

Step 2 Cleaning the Skins

  1. Cut paper bags into strips just wider than your ski.
  2. Place strip on skin and run iron over to soak up old glue.
  3. Run credit card over skin for final clean up.
  4. Do this for the whole length of the skin, until all the dirty glue is gone.
  5. The cleaner the better.

Step 3 Apply the Glue
  1. If you have Black Diamond Skins that have a covered center strip, put masking tape over it to protect it from getting glued on.
  2. Very thinly apply the glue.
  3. Make sure to get the edges and do one thin coat. Go as thin as you can.
  4. Let it dry for half an hour and apply a second coat.
  5. Let it dry for half an hour and apply a third coat.
  6. Let it dry for 12 hours.
Things to remember
  1. Put the glue on thin. It is too easy to go too thick and get globs.
  2. Make sure you do not bend the skin when it is drying.
  3. When feeling frustrated have a sip of beer.
  4. Although the glue comes with a brush, and I use the brush in the video, I would recommend applying the glue with an old credit card/hotel key only. It goes on faster and smoother and the brush leaves hair on your skin.

For more information on regluing your skins, check out Skiing the Backcountry and TetonAT.com. In addition to both sites having more information about this process, they both include a number of additional ideas to keep in mind in the comments sections.

--Jason D. Martin

Monday, February 7, 2011

Waxing Skis and Snowboards

Surprisingly, only a small percentage of skiers and snowboarders take the time and energy required to properly wax the base of their equipment. Skis and snowboards simply don't perform as well when they are not maintained.

There are different waxes for the different temperatures. Colder snow with sharper snow crystals need a more robust wax to keep the skis from getting damaged, whereas warmer, wetter snow causes more friction, which can slow you down without the right wax.

For those that are lazy, there are rub on waxes that can easily be applied in a few minutes. But before you get too lazy, you should always remember that the more time you spend putting the wax on, the longer it will last.

Once you have determined the temperature of snow that you are likely to encounter, you will need the following items:
  • Iron for ironing the wax into the ski base
  • Vise for stabilizing skis while waxing
  • Scraper for removing extra wax
  • Brush for removing extra wax
After you have obtained the proper equipment, you're ready to make a foray into the world of waxing. We have mined the internet for two films on this subject. This first video from REI, provides a solid base of information for those who would like to wax. The second video expands on the information in the first video and provides a few extra tips for snowboarders. If you are going to start waxing your skis or snowboard, it is strongly suggested that you watch both videos to build a solid basis of knowledge. It is possible to damage your equipment without a good understanding of what you're getting into...


For more techniques including some waxing techniques for first time waxers, check out this awesome Spadout article on How to Wax Skis.

--Jason D. Martin

Sunday, February 6, 2011

February and March Climbing Events

-- Feb 12-13 -- Alpental, WA -- VertFest sponsored by OR

-- Feb 12 -- Seattle, WA -- Northwest Collegiate Climbing Challenge (UW)

-- Feb 17 -- Seattle, WA -- Steph Abegg Speaker Event

-- Feb 18 - 21-- Cody, WY -- 13th Annual "Waterfall Ice" Fest

-- Feb 26 -- Seattle, WA -- AAC Annual Benefit and Awards Dinner

-- March 12 -- Charleston, SC -- Palmetto Pump and USA Climbing Comp


Red Rock Rendezvous....Don't forget that there is a lot going on in Las Vegas in mid to late March. Following is a quick breakdown of everything that is happening:

Saturday, February 5, 2011

Weekend Warrior - Videos to get you STOKED!!

Well, it looks like it's going to be another rainy weekend in the NW.  That's why when we get a great day, we have to get out!  The guys in the following video took full advantage of a sunny day in January.  Enjoy!


Perfection on Goat Mtn. 1/9/11 from Allen Taylor on Vimeo.

-Katy Pfannenstein
Program Coordinator

Friday, February 4, 2011

Intro to Aid Technique

Free climbing is the technique of ascending a route with equipment and climbing protection, but without directly using that equipment to assist one's ascent. Instead, the equipment is used solely for safety. In direct opposition to this, aid climbing is the direct use of climbing equipment to climb a wall.

A basic aid pitch requires one to place a piece of protection. Once the piece is secure, the climber will clip an etrier or aider to that piece of gear. An etrier (which some people refer to as an aider) is a nylon ladder. The climber will climb up the etrier until she is as high as possible. The climber will then place another piece of gear and clip another etrier to this. An aid pitch requires one to do this repeatedly as he or she works up the route.


A Climber Relaxes on a Portaledge
Photo from Backcountry.com

A big wall climb is a route that is so big, that it generally takes more than a day to complete. Many walls require one to haul bags full of food, water and equipment as well as to use a portable ledge (a portaledge). This type of climbing can be equated to vertical backpacking.

Most big wall climbs require a great deal of aid climbing. Part of the reason that one must sleep on the wall is because aid climbing is incredibly slow. There has to be a piece of gear of some sort every six feet. If a climber is not quick with her system, then the time will add up very quickly and a Grade IV will turn into a Grade VI.

Aid climbing requires a lot of unusual gear. Following is a quick glossary of simple aid terms. There is a lot more to this aspect of climbing and this should simply be thought of as a quick intro:
  1. Hook -- This is literally a hook that one might use as a piece of protection. A climber will put a small metal hook over a rock lip and then clip the etrier to it in order to move up.
  2. Jumar -- The second (the follower) on an aid pitch is required to climb the rope instead of the rock. The second will usually do this with mechanical ascenders called jumars. The act of climbing up the rope with these is called jugging.
  3. A1-A5 -- The aid grade system. An A1 placement is perfect and could hold a bus. An A5 placement is really bad and will only hold bodyweight.
  4. Daisy Chain -- This is a personal anchor system with a series of loops sewn into it. A climber can place a hook (called a fifi hook) on her harness an hook the loops of the daisy to shorten it.
  5. Hauling -- The act of dragging a bag up the wall. This is the most miserable part of an aid climb.
  6. Copperhead -- A wire with a maleable copper top. These can be pounded into a crack and will usually hold bodyweight on high end aid climbs.
  7. Nailing -- A pitch that requires the use of pitons.
The following videos provide an introduction to aid technique with a focus on the methods required to climb a big wall.


At AAI we currently teach aid climbing in our Aid and Big Wall Seminar.  Additionally, we teach it in one of the Alpine Mountaineering and Technical Leadership Part III options.

--Jason D. Martin

Tuesday, February 1, 2011

Harness Alternatives

A few years ago, I was running a trip up on Mount Shuksan. One of the climbers on the trip had a problem with her harness. The end of the waist belt strap was slightly damaged and the belt simply wouldn't double back.

I decided that the best alternative was to give her my harness. I then proceeded to guide the route wearing a bowline-on-a-coil. I descended the rock portion of the route by rappelling in a diaper harness made out of a double shoulder-length sling...and everything worked out fine.

While that experience wasn't the most comfortable of my life, I definitely drew on my knowledge of harness alternatives to make it happen the trip happen. It's important for every climber to have a small bag of tricks to reach into when something weird goes down.

In this Blog, I have assembled a couple of short articles on harness alternatives and have found a nice video that will help you develop your own bag of tricks.

The following demonstration of how to tie a bowline on a coil is from the website for the Blue Ridge Mountain Rescue Group.

Bowline on a Coil

Start with 15 or so feet of the belay line wrapped around your torso with about 3 feet left over
Create a loop in the long end of the line, just like you would for the regular bowline.
Use the short piece on the other side of the wraps to finish off the bowline
The finished knot.
This was often used long ago as an impromptu harness. this is not recommended today because of the availability of pre-fabricated harnesses and the ability to tie a much better harness from 1 inch tubular webbing. If none of those are available, however, this method is preferable to a single loop around the body because it distributes the weight much more across all those wraps.

There are two options when it comes to creating a harness out of webbing. The first option is to use a long sling or runner and to wear it like a diaper. The second option is to create a hasty harness, also known as a swiss seat harness. Naomi Judd wrote the following breakdown of how to do this for trails.com:

Step 1

Find a piece of webbing that is 7 to 9 feet long, depending on how large the person using the harness will be.
Step 2

Tie a water knot with the ends of the webbing so that it creates one big loop. Do this by making a loose overhand knot with one end of the webbing, then take the other end of the webbing and insert it into the loose overhand following the curves of the knot. Pull tight so that the knot has the two ends coming out on opposite sides.

Step 3

Wrap the webbing around the back of the person with one strand above the hips and one below.
Step 4

Reach for the lower strand, and bring it between the legs and to the front of the body.

Step 5

Attach a locking carabiner to the three strands meeting in the front of the body, near the navel. You now have your makeshift harness.

Following is a nice video that demonstrates how to build a hasty or Swiss harness out of webbing. Clearly a harness made out of webbing -- as well as a harness made out of a long sling -- would be very uncomfortable to hang in...not to mention the fact that it would be far easier to fall out of such a harness. But occasionally you need something on the fly.

In the video you are about to watch, the climber says that you should get instruction at a climbing gym. I would argue that one should never go to a local indoor climbing gym to learn about anything funky at all. Climbing gyms do a good job at teaching the basics of belaying and tying in. But you should never turn to a climbing gym person for instruction beyond that.


Obviously these techniques are unusual. As Scott in the video says, practice them, but then get checked out by a guide. A mistake in any of these harness alternatives could put your life in danger.

--Jason D. Martin