Coiling a rope is both a skill and an art. First, it's a skill because no matter how you coil the rope, you should be proficient and it should be easy to uncoil the rope for use. Second, it's an art, because each of us have our own little tricks that we throw into coiling that make a given coil our own.
Mike Barter, the prolific climbing instructional video-maker, has a handful of different rope coiling techniques posted on his youtube channel. The one thing that he neglects to say though, is that before you start in any rope coiling endeavor, you should flake the rope. This first video of an individual doing a butterfly coil in his hand is a great example of someone who skipped the flaking part of the process.
Butterfly coils -- or lap coils, if that's what you prefer -- can be bulky and difficult to deal with when they are in your hand, particularly if you have small hands. In the next video, we will have the opportunity to see the same type of system done over the neck.
Mike calls coiling over the neck the Brit Style, or something like that. I might refer to this instead as simply a butterfly coil over the neck... And I have to say that this is also the way that most American guides coil their ropes. It's very fast and it's very easy once you've put in a bit of practice. The biggest downside is when you have a heavy and wet rope from glacier travel. When that happens it's never fun to coil over your neck...
In each of the preceding videos, it would be easy to convert the ropes, the way that the climbers coiled them, into backpacks. You must simply wrap the two ends of the rope over your shoulders, wrap them around your waist -- capturing the rope behind you -- and then tie them together in front of you. Generally a square knot tends to be the easiest and quickest knot to tie in that position that won't come undone.
Some climbers elect to butterfly a rope as a single strand. This style, sometimes referred to as a French coil, is nice for quick use of the rope. Many will do this when they are sport climbing because if you're good, the rope doesn't necessarily need to be flaked.
In the third video, Mike demonstrates the mountaineers coil. This particular style can be very nice for traveling with a rope. But where it is not nice is in uncoiling it. If you coil or store your rope in this particular fashion, it's very important to remember to uncoil the rope one strand at a time, otherwise things will get very messy.
Unless you always put your rope into a rope bag, coiling is a very important part of climbing. As I say on this blog a lot, practice makes perfect!
--Jason D. Martin
Tuesday, March 29, 2011
Saturday, March 26, 2011
Weekend Warrior - Videos to get you STOKED!!
Climbing: it's about sending, it's about falling. These two videos will get you stoked to start the spring off right!
Here's a handy conversion scale to know how hard she is sending:
7b+ = 12c, 8a = 13a, 8a+ = 13c
What goes up, must go down. Please don't show my mom this next video!
Happy Spring!
--Katy Pfannenstein
Program Coordinator
Here's a handy conversion scale to know how hard she is sending:
7b+ = 12c, 8a = 13a, 8a+ = 13c
What goes up, must go down. Please don't show my mom this next video!
Happy Spring!
--Katy Pfannenstein
Program Coordinator
Friday, March 25, 2011
The Bowline
The Canadian Guide Mike Barter is getting funnier and more creative with every video he makes. In one of his most recent videos, he covered the bowline and the bowline on a bite. And he did it all dressed like a cowboy...
Perhaps the best line of this video is when he says that a bowline is "strong enough to pull a snowboarder off his sister."
There are a couple of things that I'd like to add to this excellent video.
In addition to what Mike demonstrated, we are now teaching the double-bowline in the curriculum for the AMGA Single Pitch Instructor course. This knot is quite a bit stronger than a single bowline and not as easily untied due to cyclic loading.
Mike repeatedly states that he doesn't want to see people tie-in with a bowline. You may be aware that there is a trend in the sport climbing community wherein people tie in with a double-bowline. There are two big problems with this. The first is that many climbers don't use this technique to tie-in and will not be able to check their partner adequately. And second, if there is a problem in the knot, it is far more likely to fail than a figure-eight follow-through.
There have been a few high-profile accidents with people using a double-bowline for their tie-in. These accidents could have been avoided if the individuals simply used the industry standard figure-eight and checked each other out...
The bowline is a very important knot. And as Mike said in the video, it could even be considered a king of the knots. But when all is said and done, it really should only be used for anchoring to boulders and trees.
--Jason D. Martin
Monday, March 21, 2011
A Quiver of Ice Axes
By definition, as an alpinist, I encounter extremely varied terrain and conditions during my mountain adventures. Having a variety of gear allows me to match my equipment to the climb I'm attempting, so I can achieve maximum efficiency and effectiveness. Sometimes this means buying two of something that seemingly perform the same task, however may have slightly different specifications or purposes.
I'm sure many of you acquire multiple sleeping bags, harnesses, and other equipment, with the idea that "a friend could borrow it" if need be. Lately, I have been trying to denounce this idea, and only have multiples of the same item if they truly serve a specific function that I find valuable. This led me to think of the perfect quiver of ice axes, that would serve nearly every climb I would embark on.
GENERAL MOUNTAINEERING AXE: This ice axe serves as your "everyday axe", and should be sized for comfort. I'm 5' 10" and I prefer this axe to be around 55-60cm, which allows me to chop steps comfortably if need be. It can or cannot have a slight bend in the head, but should have an adze and a positive clearance pick - suitable for self arrest. This axe will serve the purpose of self-arrest tool, anchor, step-chopper, and balance tool, to name a few. It will be ideal for 3-day Baker Climbs or a 21-day Denali West Buttress Expedition. This is your workhorse axe, a classic piolet.
ULTRA-LIGHTWEIGHT AXE: This ice axe serves as your skiing, "just in case," and "I'm only going to be on a glacier for 400 feet but still want something for self-arrest," ice axe. It should be short, no longer than 50 cm, and is really for those short glacier jaunts or quick couloir climbs. If you try and chop steps with it for an extended period of time, you'll probably blow out your shoulder or bend the adze. It probably isn't that durable, but it doesn't need to be; the lighter the better is what you are going for here. A great axe for approaching something like the North Ridge of Mt. Stuart, or while doing some extreme skiing in the backcountry.
A PAIR OF HYBRID ICE AXES/TOOLS: Are you going to be approaching on a glacier, and then climbing a 50-70 degree alpine ridge? Will there be short sections of steep ice, or will you have to climb moderate rock with your tools? If so, these are an excellent choice which bridge the gap between true ice tools and glacier axes. Having the recurve pick is essential when it comes to feeling secure on steep terrain, however when you strap one tool on your pack and carry the other, the positive curve pick provides confidence in the self arrest position. Sometimes if things get really steep, you can match this tool with an actual ice tool. A pair of these tools will be extremely efficient and comfortable during a climb of the North Ridge of Mt. Baker, or Denali's West Rib.
A PAIR OF WATER ICE/DIFFICULT ALPINE TOOLS: These tools are made for steep water ice and challenging mixed alpine lines. If climbing pure water ice, they should have two hammers; if set up for the alpine, one adze and one hammer works well. Having the tools made out of carbon fiber is nice because it does not conduct heat as much, however they are less responsive than aluminum tools. Keep these picks sharp! You'll be using them for the most technical terrain you encounter, like Artesonraju in Peru, and the Ice Park in Ouray, CO.
If competition mixed climbing is up your alley then you'll likely need another pair of tools, however for your average alpinist this quiver should serve all their needs. All tallied up, four significantly different types of climbing can be efficiently covered by 6 ice axes/tools total. You can obviously mix and match if needed, and personal preference/ability could easily add or subtract tools from this list.
I would love to hear what your perfect quiver of ice tools looks like, and what you actually currently have. Please leave us comments!
--Andrew Yasso
Program Coordinator
I'm sure many of you acquire multiple sleeping bags, harnesses, and other equipment, with the idea that "a friend could borrow it" if need be. Lately, I have been trying to denounce this idea, and only have multiples of the same item if they truly serve a specific function that I find valuable. This led me to think of the perfect quiver of ice axes, that would serve nearly every climb I would embark on.
 |
| Grivel Air Tech Racing Ice Axe |
GENERAL MOUNTAINEERING AXE: This ice axe serves as your "everyday axe", and should be sized for comfort. I'm 5' 10" and I prefer this axe to be around 55-60cm, which allows me to chop steps comfortably if need be. It can or cannot have a slight bend in the head, but should have an adze and a positive clearance pick - suitable for self arrest. This axe will serve the purpose of self-arrest tool, anchor, step-chopper, and balance tool, to name a few. It will be ideal for 3-day Baker Climbs or a 21-day Denali West Buttress Expedition. This is your workhorse axe, a classic piolet.
 |
| Camp Corsa - the World's lightest ice axe |
ULTRA-LIGHTWEIGHT AXE: This ice axe serves as your skiing, "just in case," and "I'm only going to be on a glacier for 400 feet but still want something for self-arrest," ice axe. It should be short, no longer than 50 cm, and is really for those short glacier jaunts or quick couloir climbs. If you try and chop steps with it for an extended period of time, you'll probably blow out your shoulder or bend the adze. It probably isn't that durable, but it doesn't need to be; the lighter the better is what you are going for here. A great axe for approaching something like the North Ridge of Mt. Stuart, or while doing some extreme skiing in the backcountry.
 |
| Black Diamond Venoms: The adze has a positive clearance pick and the hammer has a recurve pick. |
A PAIR OF HYBRID ICE AXES/TOOLS: Are you going to be approaching on a glacier, and then climbing a 50-70 degree alpine ridge? Will there be short sections of steep ice, or will you have to climb moderate rock with your tools? If so, these are an excellent choice which bridge the gap between true ice tools and glacier axes. Having the recurve pick is essential when it comes to feeling secure on steep terrain, however when you strap one tool on your pack and carry the other, the positive curve pick provides confidence in the self arrest position. Sometimes if things get really steep, you can match this tool with an actual ice tool. A pair of these tools will be extremely efficient and comfortable during a climb of the North Ridge of Mt. Baker, or Denali's West Rib.
 |
| Black Diamond Cobra Ice Tools - One with an adze, the other with a hammer |
A PAIR OF WATER ICE/DIFFICULT ALPINE TOOLS: These tools are made for steep water ice and challenging mixed alpine lines. If climbing pure water ice, they should have two hammers; if set up for the alpine, one adze and one hammer works well. Having the tools made out of carbon fiber is nice because it does not conduct heat as much, however they are less responsive than aluminum tools. Keep these picks sharp! You'll be using them for the most technical terrain you encounter, like Artesonraju in Peru, and the Ice Park in Ouray, CO.
If competition mixed climbing is up your alley then you'll likely need another pair of tools, however for your average alpinist this quiver should serve all their needs. All tallied up, four significantly different types of climbing can be efficiently covered by 6 ice axes/tools total. You can obviously mix and match if needed, and personal preference/ability could easily add or subtract tools from this list.
I would love to hear what your perfect quiver of ice tools looks like, and what you actually currently have. Please leave us comments!
--Andrew Yasso
Program Coordinator
Sunday, March 20, 2011
March and April Climbing Events

Red Rock Rendezvous....Don't forget that there is a lot going on in Las Vegas in mid to late March. Following is a quick breakdown of everything that is happening:
- March 18-20 -- Red Rock Rendezvous
- March 21-24 -- Basic Rock Camp
- March 22-25 -- Learn to Lead: An Introduction to Traditional Rock Leadership
-- March 30 -- Bellevue, WA -- Marmot Mountain Works NW Ice Climbing Slide Show
-- April 8 -- Sunnyvale, CA -- Planet Granite Climbing Comp
-- April 15 -- Seattle, WA -- NWAC Snowball Fundraiser
-- April 15 - 17 -- Shenandoah, VA -- Shenandoah Rockfest
--April 18 -- Ellensburg, WA -- Ropeless Rodeo, Central WA University Comp
Saturday, March 19, 2011
Weekend Warrior - Videos to get you STOKED!!
Dreams DO Come True!
Mark Allen and Graham Zimmerman made the First Ascent of 4600-foot Alpine Big Wall in Alaska. These guys, in the eyes of AAI, are kind of a big deal and poster children for AAI. Mark Allen, now an IFMGA Guide, worked for AAI. He instructed Graham Zimmerman through our AMTL Parts 1 and 2, where Graham got his start. Graham is now a sponsored climber.
These two decided to team up as climbing partners to tackle the first ascent up the SE Buttress on Mount Bradley. This route contains 4600 feet, 29 pitches of sustained mixed climbing, 19 being M5 or WI 4 or harder. After 66.5 hours, including three on route bivys, Vitalogy (Alaska grade V, M6+, WI5 5.9R A1), was officially open for business.
Mark Allen and Graham Zimmerman make first ascent of 4600-foot alpine big wall in Alaska from Black Diamond Equipment on Vimeo.
Needless to say, dreams come true. Make your dreams a reality today!
--Katy Pfannenstein
Program Coordinator
Friday, March 18, 2011
What Trip is Right For Me?
This may sound extremely cheesy, but the most enjoyable part of my day is when I get a phone call from a potential student who asks me, "what trip is right for me?" As a former AAI student myself, I remember how exciting it was flipping through the catalog and looking on the website at all the potential courses I could take. The trouble was, I was so new to the climbing scene I had no idea where I should start! Ultimately, I ended up calling AAI and speaking with a program coordinator, because I needed advice. Sitting in the role that I am now in, I thoroughly enjoy speaking with new climbers, and finding which program will best suit their goals and desires.
When you call or email us, we will probably respond to your questions with a number of our own. Here are some common questions I ask:
If you have moderate experience on glaciers, but really want to get into climbing and leading alpine ice, then the Alpine Ice course would be right for you. If you really want to take multi-day ski tours in the backcountry, without access to an avalanche forecast, then AIARE Level 1 and Level 2 avalanche courses would be right up your alley. If becoming a mountain guide is your next career choice, then I would encourage you to look at our extensive Mountaineering Instructor Professional Training program. And if you want to just try some rock climbing for the first time ever, then going out with a guide in Red Rock might be the ticket.
When you call, the clearer your goals are in your head, the more you can accurately describe them to us, and the better we can steer you towards the right course. Our goal is to give you the training to safely and successfully meet your goals, in the most logical and exciting way as possible. If for some reason your nervous to call, just image your program coordinator looks like the picture below, and hopefully it will take the edge off!
--Andrew Yasso
Program Coordinator
When you call or email us, we will probably respond to your questions with a number of our own. Here are some common questions I ask:
- What is your backcountry camping experience?
- Have you been on a glacier before?
- Do you lead climb, and if so at what level - 5.6, 5.8, 5.10?
- Do you lead sport or traditional climbs?
- Have you done any winter climbing?
- What is your skiing ability?
- What are your climbing goals for the future?
If you have moderate experience on glaciers, but really want to get into climbing and leading alpine ice, then the Alpine Ice course would be right for you. If you really want to take multi-day ski tours in the backcountry, without access to an avalanche forecast, then AIARE Level 1 and Level 2 avalanche courses would be right up your alley. If becoming a mountain guide is your next career choice, then I would encourage you to look at our extensive Mountaineering Instructor Professional Training program. And if you want to just try some rock climbing for the first time ever, then going out with a guide in Red Rock might be the ticket.
When you call, the clearer your goals are in your head, the more you can accurately describe them to us, and the better we can steer you towards the right course. Our goal is to give you the training to safely and successfully meet your goals, in the most logical and exciting way as possible. If for some reason your nervous to call, just image your program coordinator looks like the picture below, and hopefully it will take the edge off!
 |
| An AAI Program Coordinator (who shall remain nameless), enthusiastically enjoying a conversation with a potential student. |
Program Coordinator
Tuesday, March 15, 2011
Ice Climbing in the Canadian Rockies
A few weeks ago I was blessed enough to climb with AAI guide Kurt Hicks, who is an AMGA certified Rock Guide and an Alpine Guide Aspirant. We headed up to the Canadian Rockies so that Kurt could take his 2-day Ice Instructor Assessment, a new portion of the Alpine Guide certification. Kurt and I spent a few days climbing before his assessment so that he would style the evaluation, and style it he did! Here are some photos from the stellar ice climbing that is to be had in the Canadian Rockies!
 | ||||
| Approach notes to the weeping wall: harness and crampons on at the car, walk across the road. Ridiculous! |
 | ||
| Kurt leading up the first pitch. |
 | |
| The author following on pitch 1. |
 |
| The Author traversing out to the steep stuff. |
 |
| Kurt heading up pitch 1 of Professor Falls. |
 |
| The author, happily following a stellar pitch. |
 |
| The author, doing his share of the leading on the climb. |
 |
| Kurt on assessment day, looking up the steep WI4+ pitch on Louise Falls. |
 |
| Kurt styling it through the crux, making it look easy. |
Hopefully some of these photos inspire you to get out this season or next, and climb some ice! We climb in many world class locations, including Ouray, CO and Lee Vining, CA. Come join us!
--Andrew Yasso
Program Coordinator
Monday, March 14, 2011
Definitions for Beginners: Top-Rope vs. Lead vs. Bouldering vs. Free Solo
There is a legitimate concern that some have put forward concerning this blog. Occasionally, I get a little bit too techy and forget that climbers with a multitude of skill levels read these articles. It's good to step back a little bit sometimes and make sure that everyone is on board with some of the basics.
There are four terms that we use quite often on this blog. First, the term top-rope. Second, the term lead, as in lead-climber. Third, the term bouldering. And fourth, the term free-soloing. Following is a breakdown of these terms and their definitions.
Top-Rope Climber
A top-rope climber is a person who has a rope running from his or her harness, up to an anchor at the top of a cliff and then back down to a belayer at the base. This is a standard technique, and it is the technique regularly used for beginning level climbers and at rock gyms.

The value of a top-rope is that it is highly unlikely that a climber will fall very far. The rope can be somewhat tight if the climber is a beginner or somewhat loose if he or she is comfortable.
Lead Climber
In essence, the lead climber is the guy that "gets the rope up there." A belayer pays out rope to a person as he climbs up. The leader places rock protection as he goes and clips his rope to it. He then continues climbing above the protection. Should the leader fall ten feet above his last piece of protection, he will fall past his gear, and the belayer will catch him after he has fallen twenty feet. The rope stretches so that the impact is not as great on the leader.

The act of falling on lead can be very safe, or quite dangerous. It all depends on whether the fall is "clean" or not. A clean fall means that there is nothing for the leader to hit. A fall above a ledge or a protrusion could lead to serious injury.
Leading can be done in a very responsible way that limits one's exposure to danger. But it does take a lot of training and practice to bring one's abilities to such a level where he or she has a good understanding of what kind of gear placements will hold a fall and what kind will not.
Bouldering
Bouldering is one of the fastest growing types of climbing. In this, a climber does not use a rope, but also does not climb more than a few feet off the ground. A boulderer is focused on making a handful of hard moves and will often work on those moves for a long period of time before completing a sequence.
Most boulderers use a pad or commercial bouldering mattress to protect themselves from ground-falls. Every climber who falls bouldering hits a mat or the ground, as such there is some danger involved in the sport.
Free Soloing
Often confused with free climbing, (which is simply climbing without the use of direct aid, but with a rope) free soloing is the art of climbing a route without a rope.
Obviously free soloing is the most dangerous type of climbing that there is. If an individual falls in this situation, survival is highly unlikely.
Climbing is a varied sport with many different aspects to it. Not every aspect is for every person. Ultimately, the amount of risk that you choose to engage in within the sport is completely up to you. Indeed, the level of accomplishment you feel engaging in any kind of climbing is also completely personal.
--Jason D. Martin
There are four terms that we use quite often on this blog. First, the term top-rope. Second, the term lead, as in lead-climber. Third, the term bouldering. And fourth, the term free-soloing. Following is a breakdown of these terms and their definitions.
Top-Rope Climber
A top-rope climber is a person who has a rope running from his or her harness, up to an anchor at the top of a cliff and then back down to a belayer at the base. This is a standard technique, and it is the technique regularly used for beginning level climbers and at rock gyms.

A Climber Belays another Climber on Top-Rope in Joshua Tree National Park
Photo by Jason Martin
Lead Climber
In essence, the lead climber is the guy that "gets the rope up there." A belayer pays out rope to a person as he climbs up. The leader places rock protection as he goes and clips his rope to it. He then continues climbing above the protection. Should the leader fall ten feet above his last piece of protection, he will fall past his gear, and the belayer will catch him after he has fallen twenty feet. The rope stretches so that the impact is not as great on the leader.

A Leader Working His Way Up a Climb
The act of falling on lead can be very safe, or quite dangerous. It all depends on whether the fall is "clean" or not. A clean fall means that there is nothing for the leader to hit. A fall above a ledge or a protrusion could lead to serious injury.
Leading can be done in a very responsible way that limits one's exposure to danger. But it does take a lot of training and practice to bring one's abilities to such a level where he or she has a good understanding of what kind of gear placements will hold a fall and what kind will not.
Bouldering
Bouldering is one of the fastest growing types of climbing. In this, a climber does not use a rope, but also does not climb more than a few feet off the ground. A boulderer is focused on making a handful of hard moves and will often work on those moves for a long period of time before completing a sequence.
Most boulderers use a pad or commercial bouldering mattress to protect themselves from ground-falls. Every climber who falls bouldering hits a mat or the ground, as such there is some danger involved in the sport.
Free Soloing
Often confused with free climbing, (which is simply climbing without the use of direct aid, but with a rope) free soloing is the art of climbing a route without a rope.
Obviously free soloing is the most dangerous type of climbing that there is. If an individual falls in this situation, survival is highly unlikely.
Climbing is a varied sport with many different aspects to it. Not every aspect is for every person. Ultimately, the amount of risk that you choose to engage in within the sport is completely up to you. Indeed, the level of accomplishment you feel engaging in any kind of climbing is also completely personal.
--Jason D. Martin
Sunday, March 13, 2011
March and April Climbing Events
Red Rock Rendezvous....Don't forget that there is a lot going on in Las Vegas in mid to late March. Following is a quick breakdown of everything that is happening:
- March 12-15 -- Learn to Lead: An Introduction to Traditional Rock Leadership
- March 12-14 -- AMGA Single Pitch Instructor Course
- March 14-17 -- Basic Rock Camp
- March 15-16 -- AMGA Single Pitch Instructor Exam
- March 17 -- Banff Mountain Film Festival World Tour in Las Vegas
- March 18-20 -- Red Rock Rendezvous
- March 21-24 -- Basic Rock Camp
- March 22-25 -- Learn to Lead: An Introduction to Traditional Rock Leadership
-- March 26 -- San Marcos, TX -- Texas State Flash Fest Bouldering Comp
-- April 8 -- Sunnyvale, CA -- Planet Granite Climbing Comp
-- April 15 -- Seattle, WA -- NWAC Snowball Fundraiser
-- April 15 - 17 -- Shenandoah, VA -- Shenandoah Rockfest
--April 18 -- Ellensburg, WA -- Ropeless Rodeo, Central WA University Comp
Saturday, March 12, 2011
Weekend Warrior - Videos to get you STOKED!!
As the winter continues in the Northwest, here's another ice climbing video to get your stoked! Go get'em tiger!
~Katy Pfannenstein
Program Coordinator
~Katy Pfannenstein
Program Coordinator
Friday, March 11, 2011
Skier Films Himself Falling Off Massive Cliff
Some of you may have seen this already. It is literally ripping up the ski and climbing forums across the internet.
Austrian Stefan Ager climbed to the top of a peak on the Stubai Glacier in Austria, with the intent to ski the extreme terrain below. Unfortunately, as he was clipping his boot into his ski, he slipped and literally fell thousands of feet over rocks and steep snow fields. Fortunately, he survived with only bumps and bruises.
Normally, such a story would be in our weekly news round-up and would get a couple of sentences, not a blog in and of its own. But this particular incident is special. Ager didn't just survive his ordeal, he had a helmet cam on during his entire fall.
The footage is below:
--Jason D. Martin
Tuesday, March 8, 2011
The Wilderness Experience
"How's it going?" I smiled and asked, a moment after stepping out of the skin track.
"Great," the guy said, passing me on his way up. "I just can't get enough of this wilderness experience," he continued sarcastically, "with all these people." He shook his head and skied away.
So here's a little bit more context for the story.
We were backcountry skiing about a mile from the Mount Baker Ski area. We could easily see the lifts and the parking lot in the distance. It was a beautiful blue-bird sky Saturday with very low avalanche danger. And there were probably over 100 people adventuring into the backcountry near the ski area...
While enjoying the absolutely perfect day, we came upon a number of people who really felt that there were too many people out there, that their "wilderness experience" was being tarnished by the volume of backcountry users.

To be perfectly honest, I was astonished by the attitude of these individuals.
Certainly it is possible to have a wilderness experience relatively close to the road. Certainly it is possible to have such an experience within a mile of a major tourist attraction. But it probably shouldn't be expected.
True wilderness experiences require some work. In the instance here, the individuals who want to find true wilderness would have found a tenth as many people two miles from the ski area in the backcountry, and may not have seen another person at all if they had ventured four or five miles away.
It is somewhat selfish to feel that you deserve a wilderness experience close to the road, but that no one else deserves such an experience.
Some backcountry destinations preserve an area's character by requiring permits. There is certainly a level of legitimacy for this, but in these circumstances (like the Narrows in Utah's Zion, or an ascent of Mount Whitney, or a tour of Washington's Enchantments, etc.) an individual is deep in the wilderness. These areas are so popular that without a permitting process, even when you get away from the road, there would still be people everywhere...
Most of the nation's outdoor recreation takes place within a mile or so of a road or a parking lot. As such, it is quite selfish to feel that you deserve a wilderness experience close to the road, and that to preserve that experience no one else should be able to play where you're playing.
If you want remote wilderness with nobody around, you have to work for it...
Jason D. Martin
"Great," the guy said, passing me on his way up. "I just can't get enough of this wilderness experience," he continued sarcastically, "with all these people." He shook his head and skied away.
So here's a little bit more context for the story.
We were backcountry skiing about a mile from the Mount Baker Ski area. We could easily see the lifts and the parking lot in the distance. It was a beautiful blue-bird sky Saturday with very low avalanche danger. And there were probably over 100 people adventuring into the backcountry near the ski area...
While enjoying the absolutely perfect day, we came upon a number of people who really felt that there were too many people out there, that their "wilderness experience" was being tarnished by the volume of backcountry users.

A Crew of Snowboarders and Skiers in the Baker Backcountry
Photo by Jason Martin
To be perfectly honest, I was astonished by the attitude of these individuals.
Certainly it is possible to have a wilderness experience relatively close to the road. Certainly it is possible to have such an experience within a mile of a major tourist attraction. But it probably shouldn't be expected.
True wilderness experiences require some work. In the instance here, the individuals who want to find true wilderness would have found a tenth as many people two miles from the ski area in the backcountry, and may not have seen another person at all if they had ventured four or five miles away.
It is somewhat selfish to feel that you deserve a wilderness experience close to the road, but that no one else deserves such an experience.
Some backcountry destinations preserve an area's character by requiring permits. There is certainly a level of legitimacy for this, but in these circumstances (like the Narrows in Utah's Zion, or an ascent of Mount Whitney, or a tour of Washington's Enchantments, etc.) an individual is deep in the wilderness. These areas are so popular that without a permitting process, even when you get away from the road, there would still be people everywhere...
Most of the nation's outdoor recreation takes place within a mile or so of a road or a parking lot. As such, it is quite selfish to feel that you deserve a wilderness experience close to the road, and that to preserve that experience no one else should be able to play where you're playing.
If you want remote wilderness with nobody around, you have to work for it...
Jason D. Martin
Monday, March 7, 2011
Rappelling Safely
There is no doubt that rappelling is the most dangerous thing that we regularly do in this sport. There are more climber injuries and fatalities from mistakes rappelling than from any other place in all of climbing. However, there are some things that every climber can do to make rappelling safer.
First, if it is possible to safely walk off from the top of a climb, simply walk off. Limiting the amount of time that you spend rappelling is a surefire way to limit the amount of exposure that you have to potential mistakes.
Second, climbers should always try to tie off the ends of their ropes in order to close the system. This is a simple thing to do that is often overlooked. Some climbers are afraid that their ropes will get stuck after they throw them...which is a legitimate fear. Closing the system should be a default tactic. But if there are extenuating circumstances, then perhaps the system should be intentionally left open.
People seldom think about tying knots in the end of the rope in single pitch terrain, but ironically, that's where most people accidentally rappel off of a single end of the rope. All that it takes is a minor rope offset to ruin your day. Knots in the rope will keep such a thing from being anything more than another minor element to fix.
 Rappelling with a Prussik above the Device
And third, climbers should use some kind of rappel backup.
 A Prussik Hitch on a Rope
There are two friction hitch backup options that are commonly used. Some people like to put a prussik hitch above their rappel device, whereas others prefer to put an autoblock hitch below the device. There are advantages and disadvantages to rappelling both ways. The biggest advantage to either of these options is that you are less likely to die if you make a mistake. The biggest disadvantage is that it takes extra time to put these things together...
 Note the autoblock coming off the climber's legloop.
Most people will put their hand on the autoblock hitch while rappelling.
Rappelling with a friction hitch above the device has gone a bit out of fashion. One advantage to rappelling with a prussik hitch above is that it is easy to switch a rappel system into a rope ascending system. The prussik is already attached to the climber's belay loop, so all that he has to do is to add a second friction hitch for his feet below the first friction hitch.
Most climbers now rappel with a friction hitch (usually an autoblock hitch) below the device, attached to a leg loop. This allows both hands to hold the rope below the device which provides for more redundancy in the rappel.
 An Autoblock Hitch
A friction hitch works well below the device...most of the time. It is, however, imperative that climbers who employ this technique be extremely careful. If a climber elects to hang from the rope by nothing more than his device and a friction hitch, it is possible that the hitch could be disengaged if it touches the device. Such a thing would result in catastrophic failure. This usually happens when one twists his body away from the friction hitch. If a climber needs to mess around with ropes or something else while hanging from a device and a hitch, he should definitely put a catastrophe knot in below the hitch. This will ensure that should something happen, the climber will not fall to the ground.
Rappelling is the most dangerous thing that we do. So why not create more security by trying to walk off when you can? Or by tying knots in the end of the ropes? Or by putting a friction hitch into the system? Any one of these simple techniques could save your life...
--Jason D. Martin
First, if it is possible to safely walk off from the top of a climb, simply walk off. Limiting the amount of time that you spend rappelling is a surefire way to limit the amount of exposure that you have to potential mistakes.
Second, climbers should always try to tie off the ends of their ropes in order to close the system. This is a simple thing to do that is often overlooked. Some climbers are afraid that their ropes will get stuck after they throw them...which is a legitimate fear. Closing the system should be a default tactic. But if there are extenuating circumstances, then perhaps the system should be intentionally left open.
People seldom think about tying knots in the end of the rope in single pitch terrain, but ironically, that's where most people accidentally rappel off of a single end of the rope. All that it takes is a minor rope offset to ruin your day. Knots in the rope will keep such a thing from being anything more than another minor element to fix.
 Rappelling with a Prussik above the Device
 A Prussik Hitch on a Rope
There are two friction hitch backup options that are commonly used. Some people like to put a prussik hitch above their rappel device, whereas others prefer to put an autoblock hitch below the device. There are advantages and disadvantages to rappelling both ways. The biggest advantage to either of these options is that you are less likely to die if you make a mistake. The biggest disadvantage is that it takes extra time to put these things together...
 Note the autoblock coming off the climber's legloop.
Most people will put their hand on the autoblock hitch while rappelling.
Rappelling with a friction hitch above the device has gone a bit out of fashion. One advantage to rappelling with a prussik hitch above is that it is easy to switch a rappel system into a rope ascending system. The prussik is already attached to the climber's belay loop, so all that he has to do is to add a second friction hitch for his feet below the first friction hitch.
Most climbers now rappel with a friction hitch (usually an autoblock hitch) below the device, attached to a leg loop. This allows both hands to hold the rope below the device which provides for more redundancy in the rappel.
 An Autoblock Hitch
Rappelling is the most dangerous thing that we do. So why not create more security by trying to walk off when you can? Or by tying knots in the end of the ropes? Or by putting a friction hitch into the system? Any one of these simple techniques could save your life...
--Jason D. Martin
Sunday, March 6, 2011
March and April Climbing Events
-- March 12 -- Charleston, SC -- Palmetto Pump and USA Climbing Comp
-- March 12 -- Port Angeles, WA -- Jason Hummel Ski Mountaineering and Photography
Red Rock Rendezvous....Don't forget that there is a lot going on in Las Vegas in mid to late March. Following is a quick breakdown of everything that is happening:
-- April 8 -- Sunnyvale, CA -- Planet Granite Climbing Comp
-- April 15 -- Seattle, WA -- NWAC Snowball Fundraiser
--April 18 -- Ellensburg, WA -- Ropeless Rodeo, Central WA University Comp
-- March 12 -- Port Angeles, WA -- Jason Hummel Ski Mountaineering and Photography
Red Rock Rendezvous....Don't forget that there is a lot going on in Las Vegas in mid to late March. Following is a quick breakdown of everything that is happening:
- March 12-15 -- Learn to Lead: An Introduction to Traditional Rock Leadership
- March 12-14 -- AMGA Single Pitch Instructor Course
- March 14-17 -- Basic Rock Camp
- March 15-16 -- AMGA Single Pitch Instructor Exam
- March 17 -- Banff Mountain Film Festival World Tour in Las Vegas
- March 18-20 -- Red Rock Rendezvous
- March 21-24 -- Basic Rock Camp
- March 22-25 -- Learn to Lead: An Introduction to Traditional Rock Leadership
-- April 8 -- Sunnyvale, CA -- Planet Granite Climbing Comp
-- April 15 -- Seattle, WA -- NWAC Snowball Fundraiser
--April 18 -- Ellensburg, WA -- Ropeless Rodeo, Central WA University Comp
Saturday, March 5, 2011
Weekend Warrior - Videos to Get You Stoked!!!
You may think we have this secret stash of videos just lined up to share with you each weekend. The real secret however, is that we are doing the exact same thing as you probably are. Throughout the week, we steal a minute or two away from our office life to indulge ourselves in the random bounty of videos on the internet. Sometimes we find a true gem that we can't wait to share with you. And other times, we find this - something completely "off-topic" and yet cool enough to still get us stoked.
With that out of the way, here's your standard climber almost sending and then taking an awesome whipper. I wish I could climb at this level for two reason. 1) That finger crack looks absolutely beautiful and, 2) I wish I could do a one finger jam. Ridiculous on all accounts.
--Andrew Yasso
Program Coordinator
Friday, March 4, 2011
Non-Event Feedback Loops
Many climbing and ski mountaineering accidents are the result of human error. There are a number of types of human error, but the most disconcerting and common type results from a non-event feedback loop.
--I've been doing it this this way for years and nothing bad has ever happened.
--We skied the slope all day and it was fine. How were we to know that it would slide?
--The boot-track went right under the ice cliff. I just went the way everybody else went.
The thinking process behind non-event feedback is predicated on the following belief: Nothing bad happened last time and nothing bad happened to someone else; therefore, nothing bad will happen this time to me. The psychology of non-event feedback is complex, but its very existence leads to following reality:
The crag that you climb the most, the slope that you ski the most, the mountain that you've been up the most times...these are the most dangerous places that you will ever go.
Non-event feedback takes on a new dimension with group dynamics. A beginner may follow a competent leader up a mountain. The leader may look at the conditions and decide that they're safe. If the leader doesn't go through his entire thinking process, the beginner may then make the assumption that the conditions are always safe.
Avalanche research indicates that the likelihood of skiers tackling a dangerous slope increases dramatically after one person successfully skis the slope first. In other words, once someone sees someone else get away with something, they subconsciously believe that they can get away with it too.
The only way to avoid getting stuck in non-event feedback loops is to constantly question yourself. Is this safe today? Am I just following the leader? And lastly, am I responding to the conditions as they are or as I wish they were?
--Jason D. Martin
Tuesday, March 1, 2011
Ascending Systems
There are a million ascending systems out there. On this blog we have previously discussed jugging with mechanical ascenders, the prusik hitch and climbing the rope with an autoblocking device. These are all excellent techniques for climbing up a rope...but it doesn't mean that they're the only techniques.
Climbers are ultimately artists and part of the art of climbing is picking the right tool at the right time to get up or down something. As a result, the more things that you know, the more tools that you have in your toolbox. And the more things that you know, the more improvisational you can be in any type of climbing situation.
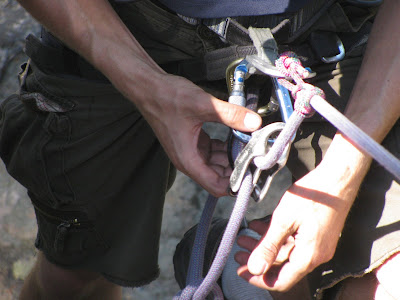
This blog will provide you with another option for climbing up a rope. To set-up this system, you will need a mechanical ascender, a GriGri and a double-shoulder length sling. The following photo shows how each of these components will be used.

Following are the steps that you will need to complete in order to make this system work:
One important thing to always remember is that you will need to tie back-up "catastrophe knots" in the rope as you climb. This should happen every ten feet or so. One should never forget to do this, as occasionally GriGris slip.
Obviously, the only way to really dial in this system is to practice it. The best way to work through this system is to print this blog out, bring it out into the field and then make it happen!
--Jason D. Martin
NOTE -- This is a re-post of a blog from last spring. To see the comments made on this blog, please click here.
Climbers are ultimately artists and part of the art of climbing is picking the right tool at the right time to get up or down something. As a result, the more things that you know, the more tools that you have in your toolbox. And the more things that you know, the more improvisational you can be in any type of climbing situation.
This blog will provide you with another option for climbing up a rope. To set-up this system, you will need a mechanical ascender, a GriGri and a double-shoulder length sling. The following photo shows how each of these components will be used.

Following are the steps that you will need to complete in order to make this system work:
- Clip the mechanical ascender to the rope.
- Clip a double-shoulder length sling to the base of the ascender. This will become your be for your foot.
- Clip a carabiner to the top of the ascender, trapping the rope inside the ascender.
- Run the rope through your GriGri below the ascender.
- Redirect the rope from the break-hand of the GriGri up through the clip that is trapping the ascender on the rope.
One important thing to always remember is that you will need to tie back-up "catastrophe knots" in the rope as you climb. This should happen every ten feet or so. One should never forget to do this, as occasionally GriGris slip.
Obviously, the only way to really dial in this system is to practice it. The best way to work through this system is to print this blog out, bring it out into the field and then make it happen!
--Jason D. Martin
NOTE -- This is a re-post of a blog from last spring. To see the comments made on this blog, please click here.
Subscribe to:
Posts (Atom)

