Denali National Park and Preserve officials initiated an aerial and ground search on June 29 for an overdue solo climber on Mt. McKinley. Juergen Kanzian, age 41 of Koetschach-Mauthen, Austria was last seen at 8:00 pm on June 27 while ascending to Denali Pass at 18,000 feet on the West Buttress route. When Kanzian had not returned to his tent at the 17,200-foot high camp by 8:00 pm the following night, a guided team alerted NPS rangers at the 14,200-foot camp.
Kanzian, a mountaineering guide in the Alps, was last seen on skis and had told other climbers he intended to ski from the summit via the standard West Buttress route. It is unknown how much survival gear and supplies Kanzian was carrying, although he was wearing warm clothing and was believed to be carrying a satellite phone. Weather conditions at the time of his disappearance included low to moderate winds, some cloud cover, and temperatures between 0 to 5 degrees Fahrenheit. In the two days prior to his disappearance, rangers at high camp recorded several feet of new snow.
On Wednesday morning, June 29, NPS rangers began ground investigations and searching with a spotting scope, while several guided and independent climbing teams headed towards the summit were on alert for clues to Kanzian’s whereabouts. On Wednesday afternoon, two air resources were launched in the search effort, including Denali’s A-Star B3 helicopter and a Pilatus PC-12 fixed wing aircraft from the Aviation Branch of the Bureau of Land Management (BLM). In six flight hours focused at upper elevations and along the West Buttress route, there were no initial signs of the Austrian mountaineer, however hundreds of high resolution photos were taken and are currently being examined for clues.
The aerial, ground, and photographic search resumed early Thursday morning, and is expected to continue as weather permits.
Thursday, June 30, 2011
Search Underway for Missing Climbers
The American Alpine Institute just received the following email from Denali National Park:
Tuesday, June 28, 2011
New Report Shows America's National Parks are in Jeopardy!
The American Alpine Institute just received the following press release from the National Parks Conservation Association.
National Parks Conservation Association Says Obama Administration Must Address Threats Facing National Parks and Develop Comprehensive Long Term Plan for Parks
WASHINGTON, D.C – New research released today by the nonprofit National Parks Conservation Association (NPCA) provides the first ever broad look at how America’s national parks are faring in the face of pollution, invasive species, climate change, energy development, adjacent land development and chronic funding shortfalls. A decade in the making, the report – The State of America’s National Parks – represents the most comprehensive overview yet performed on resource conditions in America’s national parks.
NPCA’s Center for Park Research wrote the report based on its studies on resource conditions at 80 national parks across the country, a 20 percent sample of the 394 parks in the National Park System. The report finds that long-standing and new threats are impacting wildlife and water and air quality within our national parks. The historic sites that tell the story of the Civil War, the civil rights movement and the evolution of America’s diverse culture are also suffering, mostly because of a lack of funding. “Our national parks are places we go for reflection, inspiration, and connection to our national heritage – they are places we as Americans decided to protect to showcase where America’s story has unfolded. But new data shows that our national parks are in serious jeopardy,” said Tom Kiernan, president of the National Parks Conservation Association. “As we approach the 2016 centennial of the National Park Service, we have a responsibility to ensure our American treasures are preserved and protected for the future.”
Air, Water, Wildlife at Risk
The assessment revealed stark realities, including the loss of native plants and animals from park landscapes. Ninety-five percent of parks assessed had at least one wildlife or plant species that had disappeared from the area, including large predators such as gray wolves, mountain lions, and grizzly bears. In places such as Hawai’i Volcanoes National Park, invasive plants and animals are crowding out native species, some of which are now extinct. Air and water quality in the parks are also suffering. More than half of the parks studied (63%) have compromised air quality conditions. Numerous parks, such as Gateway National Recreation Area and Big Hole National Battlefield, also reported serious water quality issues, including contamination and depleted water resources that affected the entire ecosystem.
The majority of threats to natural resources stemmed from human activities, including development on lands adjacent to national parks that is negatively impacting resources inside park boundaries.
“From Grand Canyon to the Great Smoky Mountains, mining, energy production, roads, and housing projects on adjacent lands are fragmenting wildlife habitat, diminishing air quality, disrupting cultural landscapes, and contaminating water resources,” said Kiernan.
Climate Change Threatens Survival of Iconic Species
The report also indicates that climate change is a systemic threat to the iconic flora and fauna of many national parks—the Joshua trees of Joshua Tree National Park and the redwoods of Muir Woods National Monument and Redwood National Park among them. Rising sea levels due to climate disruption threaten to inundate coastal archaeological sites in Katmai National Park and Preserve in Alaska. And at Isle Royale National Park, significant changes in the quantity of snow could impact moose-wolf dynamics and threaten the survival of both species in this wilderness park.
Historic Artifacts and Cultural Treasures in Peril
An often forgotten mission of the National Park Service is that of curator and keeper of America’s historic artifacts and cultural gems. Two-thirds of the 394 units in the National Park System were designated to protect important historic or cultural sites, but rarely does the agency have enough trained staff – or receive the funding – to properly care for them.
The report found that in more than 90 percent of the parks surveyed, cultural resources were found to be in deficient condition. The Park Service estimates that more than 60 percent of the 27,000 historic structures are in need of repair or maintenance. Many parks lack adequate documentation and research on their cultural resources, and their artifacts are being insufficiently monitored—meaning that theft and deterioration may go unnoticed.
Chronic funding shortfalls have prevented many park sites from having enough trained professionals to oversee their cultural resources. Our national parks suffer from an annual operations shortfall of more than $600 million. With too few staff to watch over them, some prehistoric sites and battlefields continue to be looted, historic buildings are neglected, and museum collections are left unorganized. Historic structures are in need of care and repair, but the work often gets deferred. Almost 30 percent of the assessed parks reported deferred maintenance costs in excess of $1 million.
Reasons for Hope – What’s Working Now
Yet the report shows that despite the challenges facing our national parks, many of the parks assessed have developed management approaches to effectively address the erosion of natural and cultural resources. For example, a vessel management plan at Glacier Bay National Park and Preserve helps protect marine mammals from being struck by ships. And the removal of non-native species and a captive breeding program have helped restore Channel Islands’ native island fox population. Research at a number of parks shows that when National Park Service staff have sufficient financial support, up-to-date scientific information, and adequate training, positive stories of resources protection are abundant.
A Call To Action
While the Parks Service looks to its 95th anniversary and the next century, advocates continue to point to simple, straightforward solutions to address the challenges facing our national parks. Report recommendations suggest that the Obama Administration must develop a comprehensive long term plan for the parks that reduces threats from energy development and other adjacent uses, enforces air quality laws, and monitors water quality. In addition, long term protection is dependent on fully funding the National Park Service, the federal agency tasked with overseeing the parks and their assets. The full list of recommendations can be found at www.npca.org/cpr/sanp/SANP-summary-WEB.pdf.
NPCA is also calling on the Obama Administration to issue an Executive Order to recommit federal resources and policies to preparing our parks for the next century by reintroducing native wildlife, implementing climate change adaptation and mitigation, better managing large landscapes to conserve and restore ecosystems, improving the condition of cultural resources, and incorporating under-represented themes of American history and cultural diversity.
“The State of America’s National Parks report is our wakeup call. The natural and historical treasures that Americans value have been vulnerable for too long. This is a turning point in the history of our parks, and we must not break the promise that past generations made to our children and grandchildren,” said Kiernan.
To view a full copy of the report, please visit: www.npca.org/cpr/sanp/. To download report photos: www.flickr.com/photos/30346074@N04/sets/72157626889633691/
###
About National Parks Conservation Association (NPCA): Since 1919, the nonpartisan National Parks Conservation Association has been the leading voice of the American people in the fight to safeguard our National Park System. NPCA, its members, and partners work together to protect the park system and preserve our nation’s natural, historical, and cultural heritage for our children and grandchildren.
Rock Climbing Styles
Many beginning level climbers are confused by the terminology used to
define different styles of climbing. This isn't too surprising because
there are a lot of terms that get thrown around. The following is a
quick discussion of the different types and styles of climbing and what
they entail.
Toprope Climbing
When a climber uses the term "toprope," he is referring to a technique wherein an anchor is set at the top of the cliff. A rope runs from a belayer at the base of the cliff, up to the anchor and then back down to the climber. As the climber ascends the wall, the belayer takes in rope through his belay device. If the climber falls, the belayer merely locks off his device, arresting the fall. This system is designed to stop the climber's fall immediately.
The leader is the first person to climb a cliff. As the leader ascends the wall he drags a rope up that is tied to his harness. As he works his way up a wall he will put in rock protection. After the "pro" is in place, the leader may clip the rope into the gear while the follower belays from below. Should the leader fall, the follower will "catch" him in midair with the belay device.
Of
course, if the leader falls 10 feet above the last piece of protection,
he will actually fall 20 feet or more before the follower catches him.
That makes the leader's job quite risky. Once the leader is on top, he
may build an anchor, clip into it and put his partner on belay,
essentially providing the follower a toprope.
Lead climbing may be done on both traditional and sport climbs.
Toprope Climbing
When a climber uses the term "toprope," he is referring to a technique wherein an anchor is set at the top of the cliff. A rope runs from a belayer at the base of the cliff, up to the anchor and then back down to the climber. As the climber ascends the wall, the belayer takes in rope through his belay device. If the climber falls, the belayer merely locks off his device, arresting the fall. This system is designed to stop the climber's fall immediately.
Toproped
climbing is very safe because no one is required to "lead." In most
cases, climbers are simply able walk around to the top of a cliff in
order to set-up the system.
Lead Climbing
Lead Climbing
The leader is the first person to climb a cliff. As the leader ascends the wall he drags a rope up that is tied to his harness. As he works his way up a wall he will put in rock protection. After the "pro" is in place, the leader may clip the rope into the gear while the follower belays from below. Should the leader fall, the follower will "catch" him in midair with the belay device.
Lead climbing may be done on both traditional and sport climbs.
Free Climbing
Free
climbing does not mean, "without a rope." Conversely, free climbing
absolutely requires a rope. The defining characteristic of free
climbing is that it does not require an individual to pull on
protection. The protection exists to keep a climber from hitting the
ground should he fall, not to aid the climber on his ascent.
Aid Climbing
The polar opposite of free climbing is aid climbing. When an individual aid climbs, he places a piece of protection and then clips a nylon ladder to it. He then climbs up the ladder and places another piece, repeating the process over and over again. The climber is using direct aid to ascend the cliff face. This is often done when it is much too difficult to free climb.
The polar opposite of free climbing is aid climbing. When an individual aid climbs, he places a piece of protection and then clips a nylon ladder to it. He then climbs up the ladder and places another piece, repeating the process over and over again. The climber is using direct aid to ascend the cliff face. This is often done when it is much too difficult to free climb.
Big routes in Zion
National Park and in Yosemite
National Park are commonly aided. These are the massive routes
that sometimes require portaledges
or bivies
on the wall. Big wall aid
climbing is in many ways analogous to vertical backpacking. And
while most big wall climbs require some free climbing, they tend to lean
toward direct aid.
Free Soloing
Trad Climbing
Sport Climbing
Free Soloing
Free
soloing is the art of climbing without any ropes whatsoever. A fall
under these circumstances will result in serious injury or death. Free
soloing is incredibly dangerous and is only practiced by a small
percentage of climbers.
Trad Climbing
Traditional climbing, or "trad"
climbing, is a style of climbing that requires the leader to carry all
of his protection with him. In other words, the leader carries an array
of camming
devices, wired nuts and other assorted odds and ends that might be used
to protect the route. Traditionalists will not alter to rock in order
to create protection for the leader. In other words, a true traditional
route does not have any bolts on it.
Sport Climbing
Sport climbing is a style of climbing that requires significantly less
equipment than trad climbing. A sport climb is a route manufactured
with bolts. A true sport climb does not require any traditional gear at
all.
Many consider sport climbing to be much safer than trad climbing because in most cases the routes have been
manufactured in such a way that they are safe for a leader. As a
result, this is an incredibly popular form of climbing.
Conclusion
Climbing is an incredibly varied sport and the preceding is only the most
elemental breakdown of it from a stylistic perspective. That said, an
understanding of this beginner level material will help the novice
climber to understand the many conversations about style that take place
in the climbing world every day.
--Jason D. Martin
Monday, June 27, 2011
Fall: From Glory to Grace
The well-regarded Canadian climber and athlete, Will Gadd, has one of the most informative climbing and training blogs on the net. Through Gravsports, Gadd brings us an array of tips, techniques, and commentary on the world of climbing.
It was through his blog that we that we became aware of the video, Fall: From Glory to Grace. In this film, we watch a man take a very serious ice climbing fall and then we watch him walk away from it. The video production is well-done, but the team's assessment of the fall and what lead to it and how to avoid such a situation in the future is poorly thought out.
On Gadd's blog, he analyzes each of the elements that lead to the accident. We have done a round-up of these points below the video.
Here is a breakdown of the mistakes made:
I hope that re-posting this will help everyone in their growth and in their self assessment. I think that it is important to look at every day of climbing as a learning experience. There is no doubt that this is a dangerous sport. And it could be argued that the only way to keep playing the game is to constantly self assess and to constantly learn from every mistake, big and small...
--Jason D. Martin
It was through his blog that we that we became aware of the video, Fall: From Glory to Grace. In this film, we watch a man take a very serious ice climbing fall and then we watch him walk away from it. The video production is well-done, but the team's assessment of the fall and what lead to it and how to avoid such a situation in the future is poorly thought out.
On Gadd's blog, he analyzes each of the elements that lead to the accident. We have done a round-up of these points below the video.
Here is a breakdown of the mistakes made:
- --First and foremost, ice climbing is a sport where falling is NOT acceptable. Sure, it's okay to fall on top-rope, but it is definitely not okay to fall on lead. In some rock climbing situations, it's okay to fall on lead, but even there one can get hurt. With twenty-four sharp points on your feet, and five sharp points in your hands, there is a lot that can puncture you or catch on the ice, forcing a limb to bend in a way that it wasn't meant to bend.
- --The placement of gear in ice climbing is meant to keep you from taking a ground fall. It is not meant to keep you safe in a small fall.
- --Leaders should be comfortable on the terrain that they are leading prior to climbing a given pitch. There is nothing wrong with top-roping at the grade until you're comfortable. Leading adds a lot of extra stressors. One has to place screws, think about where the route's going, etc.
- --Top-roping will also help with technique. Gadd points out that many of the climber's tool placements are subpar and that his footwork is terrible.
- --One should practice clipping into the tool. There are many ways to do this. At one point in the video, we can see one of the climbers that assisted the injured showing them how to deal with such a situation. If you can clip into the tool, then you will have the ability to place a screw. In Gadd's response the video, he writes, "stop before you get super pumped, put in a good screw, reset, maybe back off if you can't climb the pitch without getting super pumped. Or, climb it in five-foot sections putting in a screw and hanging; I have FAR more respect for someone who doe that than gets pumped and falls off. If you're super pumped stop, reset. No "free" pitch is worth getting injured for."
- --The belayer talks about putting slack in his anchor system so that he can easily move out of the way if there's icefall. He should have built his belay in a place where there was no icefall to begin with. In a single pitch setting, this is very easy to do.
- --The belayer is also belaying the leader with a GiGi. This device is not designed to belay leaders.
- --The climber is wearing a Black Diamond Bod Harness. It appears that the harness is not double-backed. He is very lucky that he didn't simply slide right out of his harness after the fall.
I hope that re-posting this will help everyone in their growth and in their self assessment. I think that it is important to look at every day of climbing as a learning experience. There is no doubt that this is a dangerous sport. And it could be argued that the only way to keep playing the game is to constantly self assess and to constantly learn from every mistake, big and small...
--Jason D. Martin
Weekend Warrior -- Videos to get you stoked!
We've got a very special collection of videos this week that are guaranteed to satisfy your hunger for the stoke. Since the weather has been drying up in the Northwest I decided it was time to highlight one of the great climbing areas close to home, Squamish. These amazing granite cliffs to the north offer some of the best climbing around but don't take my word for it...check out the videos!
The first video on the line-up features an inspirational story of a quadriplegic on a mission to climb the Grand Wall. With pure dedication, a lot of ingenuity, and a bit of support he is able to make an attempt at the huge granite face. Does he make it...watch and find out!
The second video showcases the first ascent of the infamous Dreamcatcher on the Cacodemon Boulder. Watch as the gravity defying Chris Sharma sends this incredible, seemingly impossible line. I don't know how he does it...maybe it's the loud screaming whenever he gets pumped. I think I'll give it a shot next time I'm at the crags.
The final video is my personal gift to all of you. We had to dig into the archives for this little gem of a video, which is probably the greatest music video ever made...seriously, this thing is pure gold! Watch as David Lee Roth transforms himself from a hip-thrusting, roundhouse kick throwing (eat your heart out Chuck Norris) rock and roll superstar into a pendulum swinging, tyrollean traversing Yosemite rock climber. Let's not forgot David's exit off-stage at the end of this video..pure genius.
Sunday, June 26, 2011
July and August Climbing Events
-- June 25 - 26 -- Mazama, WA -- AAC's RockFest 2011 with Sonnie Trotter and Will Stanhope
-- July 6 - 10 -- Lander, WY -- International Climber's Festival
-- July 13 - 17 -- Squamish, BC -- Squamish Mountain Festival
-- July 13 - 16 -- Norway -- World Base Race
-- July 14 - 18 -- New River Gorge, Vest Virginia -- Homo Climbtastic
-- July 16 -- Eldorado Spings, Co -- Zanskar Odyssey Flim presented by the American Alpine Club
-- August 1-6 -- Stockholm, Sweden -- Stockholm Climbing Festival
--August 4-7 -- Salt Lake City, Utah -- Outdoor Retailer Show
--August 19-21 -- Adirondacks, NY -- Chicks Climbing
Friday, June 24, 2011
St. Elias Expedition: June 12 – 25 Dispatch #8
Flying Out
St.
Elias Expedition: June 12 – 25
Guide: Tom Kirby
Climbers: Carmie Hull (Del Mar, California), Doug Wilson (Aloha, Oregon)
Tom Kirby called in with the following dispatch at 3:00pm on June 24th:
Climbers: Carmie Hull (Del Mar, California), Doug Wilson (Aloha, Oregon)
Tom Kirby called in with the following dispatch at 3:00pm on June 24th:
“Hi! It’s Tom again. Today we flew out from the glacier at
about 11 this morning. It looked like a warm front was settling in, so we
decided to fly out today rather than risk the bad weather from missing our
chance out. Right now, we’re at the lodge hanging out until 5 – that’s when our
pilot will com take us back to Chintina. We’ll probably camp somewhere around
there or between there and Anchorage, then make the rest of the drive to
anchorage the next day. In any case, we really had a great trip! Yesterday was
a great way to end it. We could see everything and it was unreal. Depsite the
trouble with warm weather and snow conditions, we made the most of it, and
really enjoyed each other’s company. I had a fantastic time. I’ll call again
tomorrow just to confirm we’re home safe.”
Snow Climbing Techniques: The Butt-Axe Belay
We recently ran an article on the stomper belay, a snow climbing belay technique. In the vein of continuing to explore snow climbing belay techniques, we decided that we should spend some time on the butt-axe technique.
No. Not the buttocks technique...the butt-axe technique. So wipe that smirk off your face!
Seriously, the butt-axe technique is a good secure snow belay for steep terrain. This is an excellent technique for forty to fifty-degree steep snow. Part of the reason that it is so good, is that it is extremely fast.
The reason that this is referred to as a butt-axe belay is because after the axe is placed vertically in the snow, and a bite of rope is clipped to the axe, the climber must sit down on the head of the tool. After he sits, he will kick his heels in to create a better snow seat on top of the axe.

The climber is generally tied in directly to the end of the rope. He measures one to two feet of rope out from his harness and then clips it into the head of the axe. Once he's done this, he can sit down on it. A loop of rope is created coming from his harness to the axe. This loop becomes a new belay loop.
In the following picture you can see the loop coming out from the climber's knot to a carabiner with a munter-hitch on it. The rope then contours back underneath him to the axe.

In the preceding picture, the climber is using a munter-hitch to belay. It would also be possible to belay from the loop with a device.

The butt-axe belay is super fast, super simple, and super effective. But like the other techniques described here, it's best to experiment with this belay on low-angle terrain with minimal consequences before employing it in a real setting. You will want to know exactly how well this works in different kinds of snow prior to putting it to the test in the field.
Snow is one of the most variable mediums that we climb. It constantly changes, providing us with many different experiences throughout the season. The more techniques you have in your quiver, the more effective a snow climber you'll be!
--Jason D. Martin
Tuesday, June 21, 2011
Consumerism and Climbing
I recently watched the excellent documentary, What would Jesus Buy? The film uses a
theatrical troupe that poses as an anti-consumerism church as a window
into today's shopping-driven lifestyles. This is a very serious topic,
but the church and their tactics are also extremely funny. As a result,
the sober nature of the subject matter can be addressed in a way that
provides a non-confrontational look into how most Americans spend their
time and money.
The Church of Stop Shopping is lead by a charismatic man who acts like a faith healer in order to stop people from buying into the need to constantly shop. The Reverend Billy preaches of the shopacalypse, an apocalyptic time when the world will literally collapse in on itself from too much shopping. The Reverend and his choir preach their message in front of Walmart and Starbucks and in churches across America. Check out the trailer below:
The documentary got me thinking. How do we as climbers and as outdoor people buy into the need to constantly get more stuff?
Clearly, based on the climbing and skiing and hiking gear stored in my garage, the Reverend Billy would see me as great sinner. A consumer with too much stuff for my own good.
However, I would argue that I use all my stuff until it wears out. I would argue that I don't spend my days hanging out in shopping malls and I would argue that I'm a fierce advocate for these sports that I love...sports that revolve around getting away from buying more stuff and getting people out to experience the outdoors.
I would also argue that the stuff we buy allows us to experience wild places that need protection. Our ability to see the beauty of these places leads us to become stewards of them, either from afar with our choice of elected officials and our donations to stewardship funds, or from close by with trailwork and litter cleanups. The stuff we as outdoors people buy leads us to be better advocates for wild places.
And indeed, many expeditions go to places where the entire economy is based on visiting climbers and trekkers. Not only do those who visit such places bring money into those communities, but they also bring aid in the guise of schools and medical care. Many who visit these places are so impressed by the people that they support foundations that provide such services to developing countries.
Now clearly, this is my defense of our lifestyles. And it's easy for us to get tunnel vision and to only see what's good for our own selfish interests. Certainly, the person who owns 700 pairs of shoes might have just as good a defense....but then again, maybe not...
--Jason D. Martin
Monday, June 20, 2011
Lynn Hill - Visualization and Patience
In this climbing technique video, world class climber Lynn Hill
demonstrates her movement on a world class climb. While she is climbing
a 5.13a, she talks about how to be patient and how to visualize the
movement while resting.
Most of us won't be climbing 5.13s anytime soon, but that doesn't mean that this advice isn't apt. Lynn's recommendations are just as valid on a 5.6 or a 5.10 as they are on a 5.13.
--Jason D. Martin
Most of us won't be climbing 5.13s anytime soon, but that doesn't mean that this advice isn't apt. Lynn's recommendations are just as valid on a 5.6 or a 5.10 as they are on a 5.13.
--Jason D. Martin
Sunday, June 19, 2011
June and July Climbing Events
-- June 23 - 26 -- France -- Vibram Natural Games
-- June 23 -- Salt Lake City, UT -- Black Diamond Equipment Presents 2nd Annual SLCA Fundraiser
-- June 25 - 26 -- Mazama, WA -- AAC's RockFest 2011 with Sonnie Trotter and Will Stanhope
-- July 6 - 10 -- Lander, WY -- International Climber's Festival
-- July 13 - 17 -- Squamish, BC -- Squamish Mountain Festival
-- July 13 - 16 -- Norway -- World Base Race
-- July 14 - 18 -- New River Gorge, Vest Virginia -- Homo Climbtastic
Saturday, June 18, 2011
Weekend Warriors- Videos to get you Stoked!!!
Skiers take on one of the Northwest's Local Summits: Mount Shuksan. This video may make you giddy to come ski it this spring! We can provide a day or two of spring skiing for you on Mount Shuksan or Mount Baker. Call the office for more details.
Have a great weekend!
Have a great weekend!
Tuesday, June 14, 2011
Glacier Skills Course
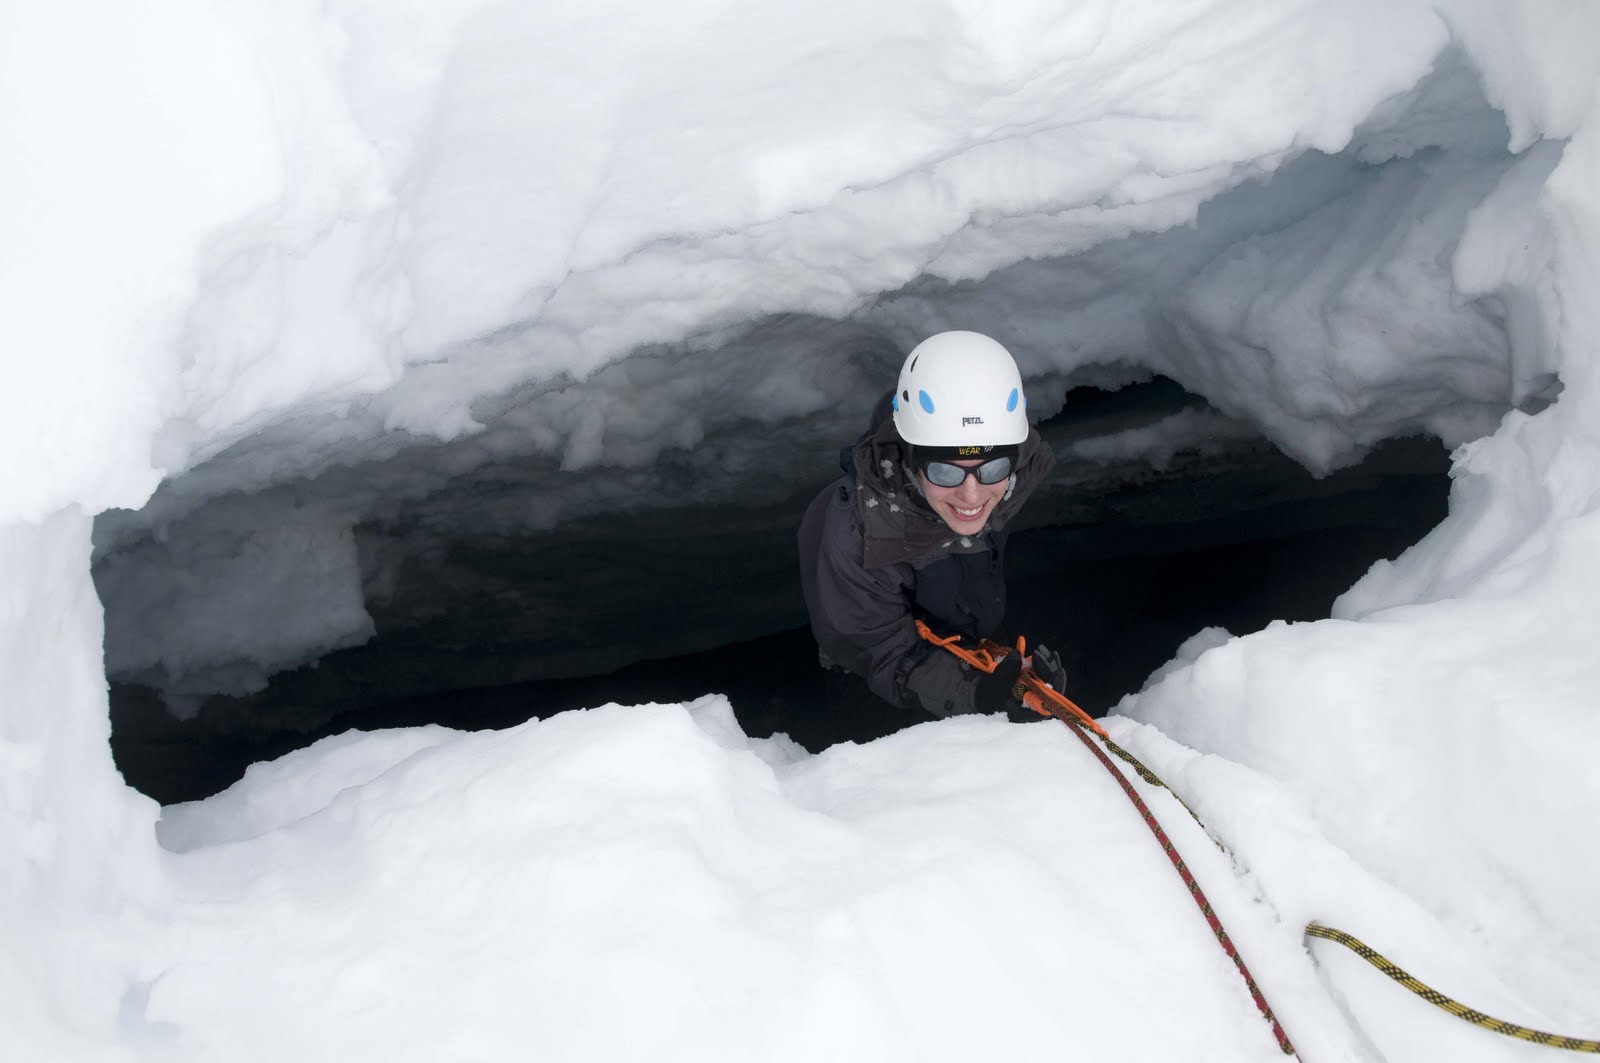
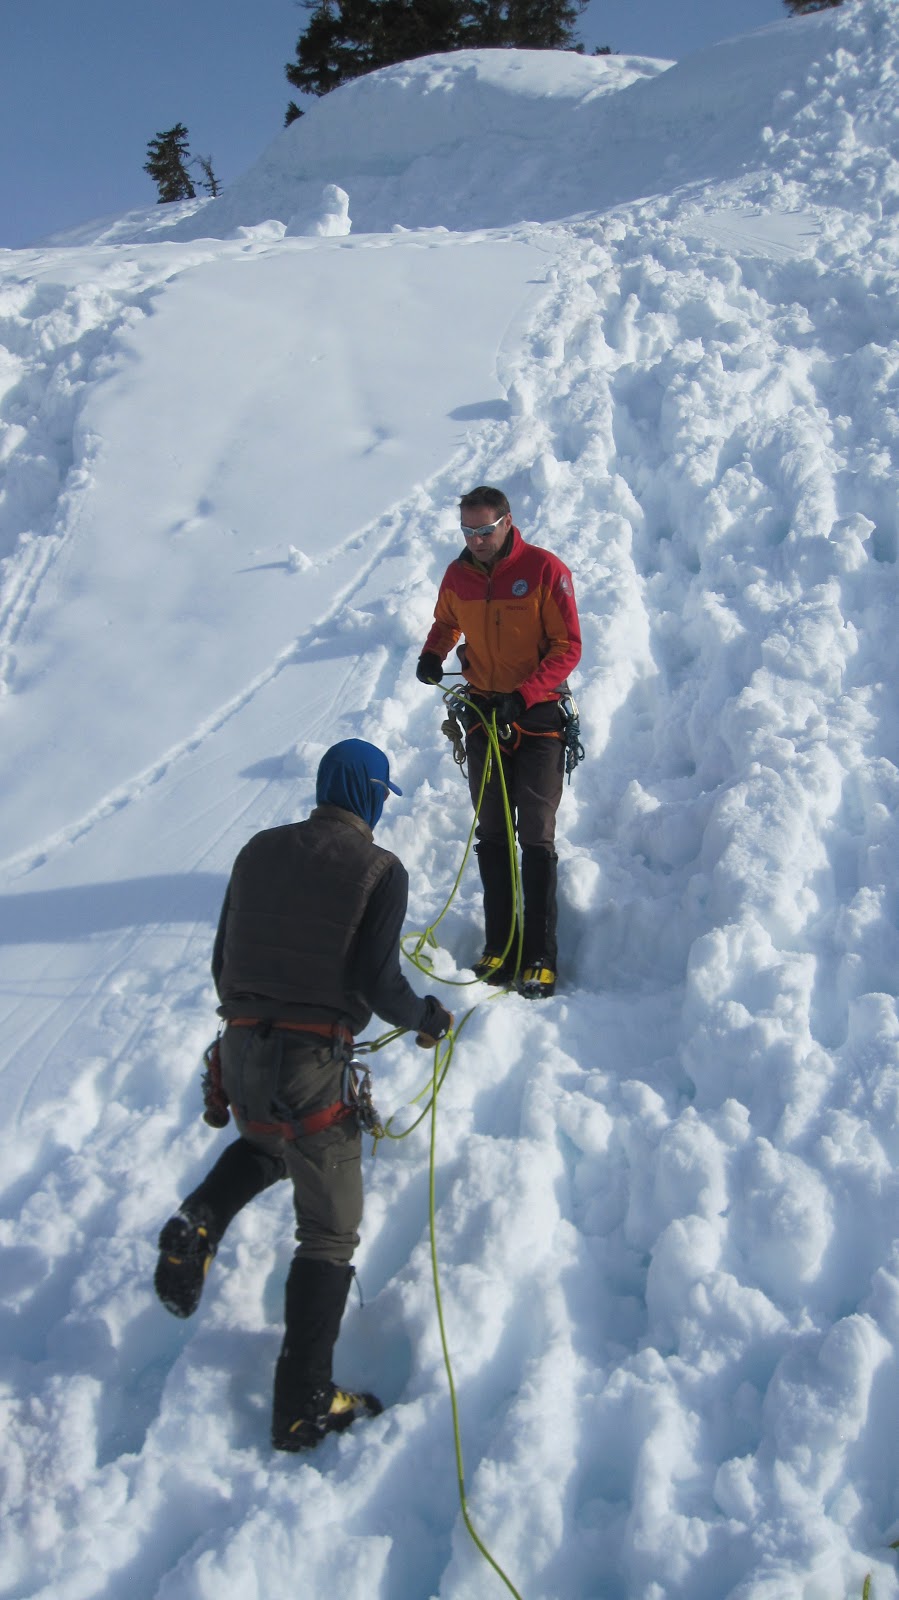
At the beginning of last week I led a glacier skills trip on Mt. Baker.
Despite the bad weather forecast it turned out to be a pretty good trip
and we managed to get a lot accomplished. I was a little worried we
would not be able to find a crevasse to do crevasse rescue in due to the
huge snow year. After a short time of searching for a hole we found an
almost perfect spot just outside of our camp. Each person got to fall
into a crevasse and each person also got to arrest a real crevasse fall
with the weight of a real person. If you spend a lot of time on
glaciers and you have not had the chance to do this you should. Its a
lot more difficult than "rescuing" a backpack.
Here are some photos of the trip.


--Alasdair Turner, Instructor and Guide
Here are some photos of the trip.


--Alasdair Turner, Instructor and Guide
Monday, June 13, 2011
The Ultimate Head to Head: Jetboil vs. Reactor
When it comes to stoves in the wilderness, over the last few years everything has changed. It used to be that guides almost universally used MSR Whisperlites or XGKs. And while these are still the standard on expeditions, most guides have made the switch to canister stoves for non-expeditionary climbing trips.
There are two canister stoves that stand out as the best on the market. They are the MSR Reactor and the Jetboil. Each of the two has advantages and disadvantages and when choosing between the products, one must weigh these carefully in order to get the right cooking system.
I spent the last month-and-a-half comparing the two stoves to one another in the field. Both stoves were used in both front-country camping situations as well as in backcountry camping situations. Both stoves were used in the snow, as well as on dry ground. This lead me to some very interesting conclusions...
Before launching into a discussion of the pros and cons of these two products, we should first list the advantages and disadvantages of canister stoves over other stoves.
Advantages of Canister Stoves:
- --Canister stoves tend to be small and compact. They are light and take up little room in a backpack.

A standard experience with a Whisperlite.
- --These stoves do not need to be primed. Some models have a sparker that lights the stove, while others require a lighter, but none require you to burn off a bunch of fuel trying to get the stove to prime.
- --The canister stoves discussed here are extremely efficient.
- --Many of the standard stoves have stove repair kits and cleaning kits that have to be used regularly to keep the stoves running. Indeed, I have personally come to the point with many of my previous stoves where they needed to be cleaned or worked on in some way for nearly every meal.
- --While these stoves can flare up, it is not as common as it is with older style stoves. This makes them more convenient for cooking in your vestibule.
- --Every ounce of fuel must be carried in disposable canisters. The canisters may be recycled, but some recycling companies do not like to take these. I usually puncture the canisters before recycling them and sometimes I even crush them with a rock. When I do this, it seems like the recycling company is okay with them being in my recycle bin.
- --It can be difficult to gauge how much fuel is in a given canister at the end of a trip. This sometimes leads to carrying extra almost empty canisters which take up space and add almost useless weight.
- --It can be difficult to "cook" real meals on canister stoves. If you're looking for something that allows for a lot of different settings for a lot of different kinds of cooking, then you should consider a Whisperlite, an XGK or a Simmerlite.
- --If you are going to do a foreign trip, it may be difficult to find canisters in a developing country.
- --Because these stoves are "skinny," they can definitely tip over.
- --The biggest disadvantage of all canister stoves is their performance in the cold. None of the stoves are as effective is extreme cold. And many of them perform poorly if they are placed directly on the snow-covered ground. To perform more effectively, the stoves will either need a hanging kit or they will need to be placed on a "stove-board."

- --The Jetboil collapses within itself. The system is completely integrated and every part of it, including the fuel canister, fits inside the pot.
- --When cooking, the pot attaches to the stove, which is attached to the canister. This makes it very easy to move the entire thing around.
- --I have used the Jetboil for cooking in my tent extensively. The fact that it is easy to move around means that I can actually cook pretty much anywhere. I often hold the entire fixture between my thighs, which also helps keep the fuel warm, making it burn more effectively. Please note that cooking in a tent does hold some danger, both of burning down the tent and of suffocating on carbon monoxide. If you elect to do this, be sure to keep your tent well-ventilated.
- --The Jetboil pot has been designed to be used as a mug as well as a pot. This does provide for the ability to cut a little bit more weight.
- --Jetboil sells a hanging kit for the stove. It is also very easy to build a kit for the stove. The nice thing about hanging the stove is that it gets it up off the snow, which allows the canister to work more effectively.
- --A specialized and very light-weight frying pan is available for other types of cooking.
- --Jetboil sells a larger pot that can be used to cook or melt water for groups.
- --There is some limited ability to control the heat (i.e. to turn it down). This makes it easier to "cook" in the system.
- --The Jetboil has a "clicker" which sparks and automatically lights the stove.
- --The newest version of the Jetboil has a regulator that is supposed to allow it to work better in cold temperatures. I do not have the newest version, so this hasn't been tested.
- --This is a very small system. If you are melting snow for more than one person, it can be taxing. If you want to cook or melt snow for more people, you need to purchase an extra pot...
- --The fact that the pot that comes with the system is small, makes it difficult to cook in.
- --The optional frying pan may be slightly too light. With repeated use, I've had the pan become damaged by heat. It is also very difficult to control the heat to a point where you can effectively make frying pan type things like pancakes or quesadillas.
- --The Jetboil doesn't work well in the wind. This is okay if you have a tent and are willing to cook in it, but this makes it difficult for bivies.
- --When trying to make a lot of water, the Jetboil commonly boils over. There is a marker line inside the pot which shows the most you can put in without boil-over, but I often want more hot water than that. In order to keep it from boiling over, you have to watch it very closely.
- --The knob on the Jetboil which controls heat is under the body of the pot, so when it does boil over you often have to put your fingers through a waterfall of boiling liquid to turn it off.
- --While cooking noodles in the pot, I constantly have to stir them, or they will get burned at the bottom. This is a function of the size of the pot. It's a bit too small to ignore.
- --The "clicker" which lights the stove broke days after I got the Jetboil. I have been lighting it with a lighter ever since.

- --Like the Jetboil, the Reactor is an integrated cooking system. It is compact and easy to travel with. The stove and the fuel canister both fit snugly inside the cooking pot.
- --The pot is not attached to the stove. There are disadvantages to this, but one advantage is that in a boil-over, it's easy to remove the pot prior to turning off the stove.
- --The cooking pot that comes with the Reactor is large, which allows for easier cooking, more space to melt snow, and more volume for food or drink. The fact that there is more volume makes it easier to keep things from burning in the pot.
- --The larger pot and greater volume allows more liquid to boil without boiling over.
- --And the larger pot also makes it easier to cook for more people than just one or two. Some people have complained about the volume of this stove, but those that have, haven't compared it to the Jetboil.
- --And lastly, the larger pot is certainly easier to clean than the smaller profile pot on the Jetboil.
- --This thing boils water fast. I mean really fast. I don't think I've ever used a stove that boiled water so quickly.
- The Reactor is far better in the wind than the Jetboil. I intentionally used both next to one another at a windy front-country campground and the Jetboil blew out immediately. The Reactor continued to work effectively.
- --The Reactor pot does not connect to the stove surface. This leads to all kinds of problems, like an inability to hang the system to keep it out of the snow, and less convenience when cooking inside a vestibule or tent. While using this in the field, I placed the stove on a snowshoe and it seemed to work okay, but it would have been better if I could have hung it.
- --There isn't really any ability to control the heat levels. This makes it difficult to cook anything that requires finesse.

- --An early version of the Reactor emmitted a high and potentially dangerous volume of carbon monoxide. This was attributed to the fact that the jets were improperly set-up in the prototype model. That said, the problem delayed the release of the stove for some time. This background makes me hesitant to do anything with the Reactor inside the tent. I still cooked with it in the vestibule, but kept the vestibule completely open.
- --The Reactor is a bit of a fuel hog. The surface of the stove heats evenly over a large surface area. This allows for a very quick boil, but also a very quick use of the fuel in the canister. I never really figured out how much fuel I would need for demanding activities like melting snow. This caused me to bring a lot of extra fuel on backcountry trips.
- --The fuel hog element of the stove made it hard to melt snow. I was constantly worried about how much fuel I was using while trying to fill up my water bottles.
- --At this point there are no accessories, like frying pans or different sized pots.
- --It would be nice if there were some type of rubber top or other protective cover, so that -- like the Jetboil -- the pot could be used as a mug without burning one's lips.
So there you have it. In my humble opinion, these similar systems are different enough that one is better than the other in different backcountry applications...in the broadest of strokes, the Reactor is better for backpacking and the Jetboil is better for mountaineering and backcountry skiing.
Whatever stove system you choose, be sure that it is right for you. None of these systems are exactly cheap...and while it would be nice to own both a Jetboil and a Reactor, such a thing is not realistic for most people. These are both very good products and I believe that most will be pleased with either of them in both backpacking and mountaineering endeavors...
--Jason D. Martin
Sunday, June 12, 2011
June and July Climbing Events
-- June 18 -- Flagstaff, AZ -- Flagstaff Mountain Bouldering Tour
-- June 23 - 26 -- France -- Vibram Natural Games
-- June 23 -- Salt Lake City, UT -- Black Diamond Equipment Presents 2nd Annual SLCA Fundraiser
-- June 25 - 26 -- Mazama, WA -- AAC's RockFest 2011 with Sonnie Trotter and Will Stanhope
-- July 6 - 10 -- Lander, WY -- International Climber's Festival
-- July 13 - 17 -- Squamish, BC -- Squamish Mountain Festival
-- July 13 - 16 -- Norway -- World Base Race
Saturday, June 11, 2011
Weekend Warriors- Videos to get you Stoked!!!
Top Rope Tough Guys!
This film was selected as the Viewer's Choice for the Reel Rock Film Tour 2011. Sweet terms can be added to your vocabulary such as: flying traverse, assisted dyno, ground up toproping, and top-dogging! Watching this video multiple times definitely increases the laugh factor!
Now get out there and play!
-Katy Pfannenstein
Program Coordinator
Friday, June 10, 2011
Snow Climbing Techniques: The Stomper Belay
You pull up over the final crest and you're off the steep terrain. Time to build a belay. But what to do? What would be the fastest and effective?
One very quick technique is the stomper belay, also known as the carabiner/ice-axe belay. This technique takes mere moments to employ and is very effective in places where it is easy and safe to stand.
To set-up this belay, stomp your ice axe into the snow. Clip a carabiner to the head of the axe and then clip the rope to the carabiner. Step on top of the axe to hold it in and then belay off your body using a hip belay, a shoulder belay or a device off your harness.
In the following photo, IFMGA guide and AAI lead guide trainer, Mike Powers, demonstrates a stomper belay on low-angle snow for a guide training. Note that he is using a hip belay, with the rope to the climber redirected off the top of the ice axe.

In this second photo, Mike demonstrates a stomper belay with a shoulder belay. Shoulder belays are almost never as effective as hip belays and indeed, it is a bit painful to hold a fall on a shoulder belay with a stomper belay, whereas one barely feels it when set-up on a hip belay.

The stomper belay is very effective when it comes to belaying high-angle snow from a low-angle position. In other words if you're on rolly terrain or at the top of the technical climbing, this technique is appropriate. It is not appropriate to do a stomper belay in the middle of a high angle section. This is primarily because the leader would not have a lot of security while standing in such terrain. A hip belay from a snow seat, or a sitting axe belay would be more appropriate.
One note of caution, the rope should always be clipped cleanly through a carabiner on the head of the axe. The rope should NEVER be set-up on the carabiner as a munter-hitch. There was a major accident in Canada when this was done inappropriately, and the rope ran from the climber to a munter-hitch on the head of the axe and then up to the hip-belay. And unfortunately, there were fatalities as a result of this mistake.
As with any new technique, it's good to practice in terrain where there are no consequences. Try the stomper belay with a partner on low angle terrain. Have your partner take mock falls and see how it feels. Try each of the different belay styles, off the hip, off the shoulder and off the harness and see what works best for you.
The stomper belay is a very nice little technique to have in your toolbox. When used correctly it is fast, efficient and very effective...
--Jason D. Martin
One very quick technique is the stomper belay, also known as the carabiner/ice-axe belay. This technique takes mere moments to employ and is very effective in places where it is easy and safe to stand.
To set-up this belay, stomp your ice axe into the snow. Clip a carabiner to the head of the axe and then clip the rope to the carabiner. Step on top of the axe to hold it in and then belay off your body using a hip belay, a shoulder belay or a device off your harness.
In the following photo, IFMGA guide and AAI lead guide trainer, Mike Powers, demonstrates a stomper belay on low-angle snow for a guide training. Note that he is using a hip belay, with the rope to the climber redirected off the top of the ice axe.

In this second photo, Mike demonstrates a stomper belay with a shoulder belay. Shoulder belays are almost never as effective as hip belays and indeed, it is a bit painful to hold a fall on a shoulder belay with a stomper belay, whereas one barely feels it when set-up on a hip belay.

One note of caution, the rope should always be clipped cleanly through a carabiner on the head of the axe. The rope should NEVER be set-up on the carabiner as a munter-hitch. There was a major accident in Canada when this was done inappropriately, and the rope ran from the climber to a munter-hitch on the head of the axe and then up to the hip-belay. And unfortunately, there were fatalities as a result of this mistake.
As with any new technique, it's good to practice in terrain where there are no consequences. Try the stomper belay with a partner on low angle terrain. Have your partner take mock falls and see how it feels. Try each of the different belay styles, off the hip, off the shoulder and off the harness and see what works best for you.
The stomper belay is a very nice little technique to have in your toolbox. When used correctly it is fast, efficient and very effective...
--Jason D. Martin
Tuesday, June 7, 2011
The Class of 2011 - AAI Guide Training
The American Alpine Institute has long set the industry standard for guide training. No other guide service in the country offers the level of training and continuing education to their guide staff. Indeed, the American Mountain Guides Association based their guide training and guide certification standards on this Institute course.
Day One (5/3):
On the first day of the course we met all of the new guides at the American Alpine Institute office in Bellingham. We were extremely excited to meet the new guides and to begin working with them. The group comes from diverse backgrounds and each of them has a great deal to offer both AAI and those who choose to climb with AAI.
After a meet-and-greet, the group went out to Mount Erie to practice single pitch guiding techniques and to study the systems. All of the new guides already hold a Single Pitch Instructor certification or higher, so it was primarily a review.
In the late afternoon we returned to the Institute office, where the guides met our director and learned about the company's history.
Day Two (5/4):
On the second day of the guide training, AAI Director of Staff Development, Michael Powers joined us just outside of the Mount Baker Ski area. It was there that we began working on the guide's snow and ice skills.


Day Three (5/5):
After spending a wet night near the town of Glacier, we returned to the ski area and began to practice crevasse rescue techniques.


Days Four through Eight (5/6-5/10):
On the fourth day, we drove three hours to the east side of the mountains to begin working on rock in the scenic town of Leavenworth, Washington.


Day Eight (5/10):
Early on the eighth day of the course, we packed up camp. Before leaving town, we elected to climb one more multi-pitch line. The guides were able to select from a number of routes in the Duty Dome area. I climbed Heart of Gold (5.10a) with Ben and Chad.


After we completed our ascent, we made our way over to Snoqualmie Pass. The plan was to climb a little alpine rock peak called the Tooth. The Tooth is arguably the most popular alpine rock climb in the state. It's only an hour and a half from Seattle, so it can get a bit busy.
We went to bed early that night to prep for the next day.
Day Nine (5/11):
Unfortunately, we woke up to rain and slugs in the campground. Rain and slugs don't make for a good summit day...so we bailed back to Mount Erie where we began to work on rock rescue skills.

Day Ten (5/12):
On the tenth day of our training, we finally made our way up to the North Side of Mount Baker. We run quite a number of courses on the North Side, like Baker Ascents, Glacier Skills Courses, Denali Preps and Ice Courses.
Once we obtained the glacier, we began to work on glacier climbing skills, glacier skiing skills and ice climbing techniques.


Day Eleven (5/13):
We got up early and got after it because it looked like rain was going to come in later. We continued to work on the skills that we began to develop the preceding day and then hiked out that evening. We didn't get back to Bellingham until approximately 11pm.

Day Twelve (5/14):
On the twelfth day, we rested... Something we really needed. None of the days up to that point were short. Indeed, most of them found us still working on the snow or at the crag until 7pm or later.
Day Thirteen (5/15):
On the morning of the thirteenth day it was raining everywhere in the state. There were flood warnings for areas both east and west of the mountains. As such, we spent the morning going over administrative things.
At about noon we left for the east side of the mountains. At five, we arrived in Frenchman Coulee, a desert cragging area east of the mountains. It was the first place we found where it wasn't raining. There we began to review our rock rescue skills some more.
Day Fourteen (5/16):
This was another long day of rock rescue and cragging skills. We discovered that our new guides are very strong rock climbers, with all of them climbing 5.10 and some of them climbing 5.12.


Day Fifteen (5/17):
One of the great problems with the 2011 training was access to alpine rock. Washington Pass -- where we usually spend a great deal of time on our trainings -- was closed. There was too much snow at the Pass and they hadn't opened the road yet. As such, we attempted the Tooth a second time...and this time we were successful!
We all skied in and skied out in order to practice ski guide skills and techniques. I really didn't want to carry a second pair of boots up to the peak, so I elected to climb the Tooth in ski boots...something that was actually quite difficult!


Day Sixteen (5/18):
On the final day of the course, we returned to Leavenworth and climbed variations to the R&D route on the Icicle Buttress. After completing our four pitch adventures, we made our way back to Bellingham for debriefs with the Director...
Day Seventeen through Day Twenty-One:
The last week of training, the guides went out on a student teaching trip. They continued working with me and with some of our real climbers over a period of five days. Following that, we set them free...
...for a time...
We do require that each of our guides continues their journey and that they each take AMGA courses or participate in internal guide trainings or both. The result is that every guide is always getting better at teaching, becoming stronger at climbing, and developing better guide techniques...
--Jason D. Martin
Day One (5/3):
On the first day of the course we met all of the new guides at the American Alpine Institute office in Bellingham. We were extremely excited to meet the new guides and to begin working with them. The group comes from diverse backgrounds and each of them has a great deal to offer both AAI and those who choose to climb with AAI.
After a meet-and-greet, the group went out to Mount Erie to practice single pitch guiding techniques and to study the systems. All of the new guides already hold a Single Pitch Instructor certification or higher, so it was primarily a review.
In the late afternoon we returned to the Institute office, where the guides met our director and learned about the company's history.
Day Two (5/4):
On the second day of the guide training, AAI Director of Staff Development, Michael Powers joined us just outside of the Mount Baker Ski area. It was there that we began working on the guide's snow and ice skills.

David Farkas works on multi-pitch snow anchors
David came to us with a degree in adventure education and experience working for Outward Bound

Lead Guide Trainer and Former Technical Director for the
AMGA, Mike Powers, demonstrates a Stomper Belay
Day Three (5/5):
After spending a wet night near the town of Glacier, we returned to the ski area and began to practice crevasse rescue techniques.

Dustin Byrne and Andrew Yasso pretend to be injured climbers in a crevasse rescue scenario
Dustin has worked as our Alaska Food Coordinator over the last few seasons and Andrew is currently our Alaska Program Coordinator. Both of these new guides are working on Denali this season.

David tries to rescue Ben Gardner in a crevasse rescue scenario.
Ben is an avalanche educator and the former director of the North Carolina Outward Bound Climbing Program.
Days Four through Eight (5/6-5/10):
On the fourth day, we drove three hours to the east side of the mountains to begin working on rock in the scenic town of Leavenworth, Washington.

Ben shares a belay with Chad Cochran, while Chris Benson climbs
Chad is an AMGA certified Rock Instructor from West Virginia, and Chris is a avalanche educator
and former Outward Bound Instructor.

Andrew is very impressed by the fact that he gets to work with ubber-guide Mike Powers.

Chris follows up Midway (5.6) on Castle Rock

Erin Smart belays on the February Buttress
Erin is an avalanche educator who has worked part time for us for a year. She will also be working on Denali for AAI.

David leads a group on February Buttress, While Chris follows another group.
Day Eight (5/10):
Early on the eighth day of the course, we packed up camp. Before leaving town, we elected to climb one more multi-pitch line. The guides were able to select from a number of routes in the Duty Dome area. I climbed Heart of Gold (5.10a) with Ben and Chad.

Ben follows Heart of Gold, a slabby four-pitch 5.10a

Mike is biting his fingernails in mock fear as the team gets way up there.
And Chris throws up his hands in defeat!
After we completed our ascent, we made our way over to Snoqualmie Pass. The plan was to climb a little alpine rock peak called the Tooth. The Tooth is arguably the most popular alpine rock climb in the state. It's only an hour and a half from Seattle, so it can get a bit busy.
We went to bed early that night to prep for the next day.
Day Nine (5/11):
Unfortunately, we woke up to rain and slugs in the campground. Rain and slugs don't make for a good summit day...so we bailed back to Mount Erie where we began to work on rock rescue skills.

Chad teaches the group a rock rescue technique off a tree
Day Ten (5/12):
On the tenth day of our training, we finally made our way up to the North Side of Mount Baker. We run quite a number of courses on the North Side, like Baker Ascents, Glacier Skills Courses, Denali Preps and Ice Courses.
Once we obtained the glacier, we began to work on glacier climbing skills, glacier skiing skills and ice climbing techniques.

Ben practices ice climbing with a whippet...just to see if he could do it.

David rappels off of a serac in the Coleman Icefall

Erin relaxes at her tent after a long day on the glacier.
Day Eleven (5/13):
We got up early and got after it because it looked like rain was going to come in later. We continued to work on the skills that we began to develop the preceding day and then hiked out that evening. We didn't get back to Bellingham until approximately 11pm.

Skinning up the Glacier Amongst the Seracs
On the twelfth day, we rested... Something we really needed. None of the days up to that point were short. Indeed, most of them found us still working on the snow or at the crag until 7pm or later.
Day Thirteen (5/15):
On the morning of the thirteenth day it was raining everywhere in the state. There were flood warnings for areas both east and west of the mountains. As such, we spent the morning going over administrative things.
At about noon we left for the east side of the mountains. At five, we arrived in Frenchman Coulee, a desert cragging area east of the mountains. It was the first place we found where it wasn't raining. There we began to review our rock rescue skills some more.
Day Fourteen (5/16):
This was another long day of rock rescue and cragging skills. We discovered that our new guides are very strong rock climbers, with all of them climbing 5.10 and some of them climbing 5.12.

Dustin and Chad work on their Rock Rescue Techniques

Chad leads a line in Frenchman Coulee

Mike leads a line at Frenchman Coulee
Day Fifteen (5/17):
One of the great problems with the 2011 training was access to alpine rock. Washington Pass -- where we usually spend a great deal of time on our trainings -- was closed. There was too much snow at the Pass and they hadn't opened the road yet. As such, we attempted the Tooth a second time...and this time we were successful!
We all skied in and skied out in order to practice ski guide skills and techniques. I really didn't want to carry a second pair of boots up to the peak, so I elected to climb the Tooth in ski boots...something that was actually quite difficult!

The Team Approaches the Saddle near the Tooth

Andrew Climbing up the Tooth

Dustin Rapping Off the Tooth

Guides Ski down the Tooth Cirque
Day Sixteen (5/18):
On the final day of the course, we returned to Leavenworth and climbed variations to the R&D route on the Icicle Buttress. After completing our four pitch adventures, we made our way back to Bellingham for debriefs with the Director...
Day Seventeen through Day Twenty-One:
The last week of training, the guides went out on a student teaching trip. They continued working with me and with some of our real climbers over a period of five days. Following that, we set them free...
...for a time...
We do require that each of our guides continues their journey and that they each take AMGA courses or participate in internal guide trainings or both. The result is that every guide is always getting better at teaching, becoming stronger at climbing, and developing better guide techniques...
--Jason D. Martin
Monday, June 6, 2011
In Balance, Out-of-Balance
It seems simple, but the reality is that many serious falls take place in places that should not be that technical. Many falls take place in spots that could easily be negotiated with good technique.
When I started working at the Institute, I had quite a bit of experience. I intrinsically understood the techniques for walking on snow and on ice, but they weren't well defined in my head. Well defined techniques lead to better techniques.
The primary snow/ice-walking technique that I'm referring to is the in-balance vs. out-of-balance step. These steps are designed to be used on 30 degree to 50 degree terrain. And if they are used properly, a climber will be able to ascend a slope with a great deal of security.
In-balance and out-of-balance (the cross-over step) walking provides you with stability and a strong sense of when you are safe and when you are not. With practice it allows climbers to move effectively and safely over steepish terrain.

When one is in-balance, both feet are situated in such a way that if you stop, you will be completely stable. I shot the above photo looking down at my feet while I was in-balance. If you are carrying an ice-axe, it is best to move the axe from one placement into the next while you are still in-balance. The axe should never move while you are out-of-balance. If it stays stationary while out-of-balance, it will provide an extra point of security during less secure movements.

The above picture shows a climber taking an out-of-balance step in snow. Note that his left foot is directly above his right foot.
Clearly in the snow that the above climber is moving in, such a step is not required. One need only to move in-balance and out-of-balance in terrain that requires additional security...like on steep ice...

The in-balance out-of-balance step is incredibly useful while wearing crampons. The cross-over step allows the ankles to bend in such a way that all of the crampon points on the bottom of the boot are engaged in the ice. You'll note in the above picture, that the climber's toe is nearly pointing down hill. This allows every point to engage.
The movements required for good in-balance and out-of-balance walking are not hard to master. And the reality is that most of the time that you are moving in the mountains, such steps are not required at all. It is only when the terrain becomes steep or dangerous that it really becomes important. Indeed, the important part is not just moving properly but being aware of your movement. In other words, always knowing when you are in-balance or out-of-balance leads to more security in the mountains.
--Jason D. Martin
Subscribe to:
Posts (Atom)

