Xavier de le Rue is at it again with this new trailer for his upcoming film, "Degrees North". The first portion, which is seen in this trailer, was filmed last March in Svalbard, Norway. The team used paramotors (think paragliders with big fans on the back) to access the remote terrain.
Alexander Feichter has been busy ticking off a few hard climbs in Southtyrol, a couple of 8c's and a self-bolted 9a "Witch of Darkness." But his first climb caught on film is the 8c Flogiston, which he makes look much easier.
Stephanie Bodet calls slab climbing a"form of meditation in motion - a yoga of the rock." Her poetic and passionate vision of climbing is seen in this short film, "Of the rock I asked for the moon" while climbing Octogenese in Corsica.
Have a great weekend! - James
Saturday, February 28, 2015
Friday, February 27, 2015
Cold Weather Survival Training for the US Army
The last two days I have been out in the Mount Baker backcountry working with a group of US Army personnel. The goal of the course was cold weather survival and although not as cold as it could have been we did have some great conditions for learning and a great group of guys eager to learn.

We start the course with a classroom session and then head into the field to build shelters, cook dinner and spend the night outside. The classroom session discusses cold weather injuries, and equipment. From there we moved into the field and hiked into the backcountry. Once there we set up tents and then discussed improvised shelters, and cooking.


We had a clear and cold night.


The following morning we had several lessons, including terrain use, avalanche identification, improvised rescue sleds and white out navigation.


We concluded the course with fire building practice in the woods further down the Mount Baker Highway where we learned that starting fires in the Pacific Northwest in the winter is quite difficult especially when no lighters are allowed.


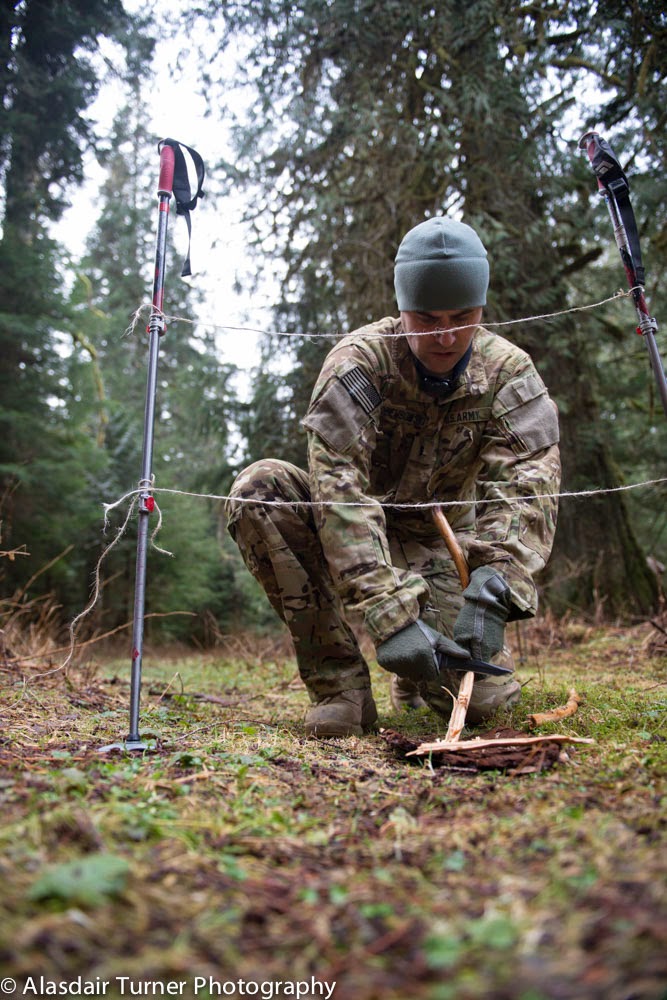
--Alasdair Turner, Instructor and Guide
We start the course with a classroom session and then head into the field to build shelters, cook dinner and spend the night outside. The classroom session discusses cold weather injuries, and equipment. From there we moved into the field and hiked into the backcountry. Once there we set up tents and then discussed improvised shelters, and cooking.
We had a clear and cold night.
The following morning we had several lessons, including terrain use, avalanche identification, improvised rescue sleds and white out navigation.
We concluded the course with fire building practice in the woods further down the Mount Baker Highway where we learned that starting fires in the Pacific Northwest in the winter is quite difficult especially when no lighters are allowed.
Tuesday, February 24, 2015
Photography on Denali - What Camera To Bring and How To Carry It While Climbing The Mountain

This is the Time of year that many people who are planning to climb Denali start to think about the equipment and gear that they will be bringing on the mountain with them. Most of the people who climb Denali make the decision to bring a camera along with them, and just like any other gear, the choice of a camera can be a difficult one. Between person and guiding trips, I have not been that he Alaska Range more than ten times and have never left my camera at home. I have seen many different types and brands of camera on the mountain and some are clearly better than others. Which camera is right for you, and how you plan to carry it depends on what your photographic goals are, but no matter what camera you bring along there are some things you will need to do both before and while on your trip to assure you come home with great photos to accompany your great adventure.

Point and Shoot vs SLR
A point and shoot camera is lightweight and easy to carry and cheaper; a single lense reflex (SLR) is bulky and heavy and expensive. Most people I know use point and shoot cameras, and for most people they are the best option. I carry a Nikon SLR with a multi purpose zoom lens (and sometimes a tripod), because it allows me more freedom to shoot the exact photo I want. The debate here goes on forever all across cyberspace. Everyone seems to have an opinion, but almost no one has had the experience of dragging multiple different cameras up Denali. So what is the best option for you? The answer lies in how serious you are about your photography and how much weight you are willing to carry.
SLRsA point and shoot camera is lightweight and easy to carry and cheaper; a single lense reflex (SLR) is bulky and heavy and expensive. Most people I know use point and shoot cameras, and for most people they are the best option. I carry a Nikon SLR with a multi purpose zoom lens (and sometimes a tripod), because it allows me more freedom to shoot the exact photo I want. The debate here goes on forever all across cyberspace. Everyone seems to have an opinion, but almost no one has had the experience of dragging multiple different cameras up Denali. So what is the best option for you? The answer lies in how serious you are about your photography and how much weight you are willing to carry.
 |
If you are a very serious photographer then by all means bring along an SLR, but remember, when you get to 11,000ft on the mountain you will begin to worry about how much weight you have. It is amazing the amount of items that get left at caches because they were just too heavy to carry.
Lenses
If you do bring an SLR bring just one lens. Find a multi purpose zoom lens that will give you many framing options. You will not be able to wander away from camps or off the regular route to shoot the exact photo you want, so having some sort of a zoom lens will be a necessity. There is lots of light on Denali. Even during bad weather there is more light that you need for photography so you do not need a fast lens. This is good news, because fast lenses are expensive and heavy. Many of the standard kit lenses are a great choice. If you use a nikon the Nikon 18-200 is a great option that I have used on the mountain several times.

Point and Shoot
Specially designed "rugged" cameras that are supposed to be extra tough are terrible. I have never seen one of these work effectively on the mountain. You do not need a waterproof camera on Denali. The water is frozen, and the air is very dry. Even if your camera does get a little wet it will dry out quickly in the sun.
I have attempted to use GoPro cameras on the mountain several times, and while they work fairly well initially, the battery life is a deal breaker. GoPro has still not figured out their cold weather battery issues and until they do you should leave your GoPro at home. It will only last a few mins in cold temps.
So what works, and what does not? In my experience any camera that uses AAA or AA batteries is a great choice. There are several cameras that do work well on the mountain not all of them use AA or AAA batteries but all have good battery life. Another feature that is nice to have is a eye peice viewfinder vs. an LCD screen. Some screens do not work in cold temps, and it is often too bright to see the screen even on cloudy days. The screen also uses a lot more battery power. Below are a few compact cameras I recommend:
Subcompact:
Nikon Coolpix L840 A nice camera that shoots high quality photos
Cannon G16 The best of the best for small cameras. Buy extra batteries as it does not use AAs.
Pocket:
Panasonic Lumix None of the Lumix line use AA batteries, but they do have very good battery life and great lenses.
Sony WX350 Another good pocket sized camera with good battery life, but bring extras.
How to Carry Your Camera
Now that you have your camera you need to figure out how to carry it. Don't stick it in an inside pocket. I often hear people say you should keep the camera warm by sticking in your clothing. Don't do this. You are the only source of moisture on the mountain.
Carrying is easy with a point and shoot type camera, because it fits nicely in a pocket (an outside jacket pocket that is). I recommend a small camera case that fits on the shoulder strap of a backpack similar to this one. This keeps the camera close by for quick use and outside clothing so there are no potential moisture issues.
For a large SLR I sometimes will keep the camera in my pack to protect it, but most of the time my camera hangs on the hip belt of my backpack. I use a top loading Lowe Pro Case like this one. This allows me to get to the camera quickly, but can be a bit annoying when I am on more technical terrain. Another option that I have seen with SLR cameras is to hang it between the shoulder straps so it is right in front of you. From a comfort perspective this is not my favorite option, but you should try several different things to see what works best for you.
Cold Weather Camera Use
One of the most common myths I hear about camera use in the mountains is that the new digital cameras don't work in the cold. I have never seen a camera that does not work in the cold. The working temperature range for most electronics is well below the temperatures you are likely to encounter in the mountains. So your camera will still work. SLR camera shutters start to fail at about -40 ambient temps. It won't get that cold on denali. There are however some parts of your camera that could be less likely to work in very cold weather, so if you are going to Denali or Antarctica, keep reading; if not, you can skip to the next section.
Very cold temperatures do effect some non essential parts of a camera directly and other parts indirectly. One example is the LCD screen on the back of a camera. These can freeze at low temperatures, or just not work quite right, so you can't depend on that. Get yourself a camera with a view finder so you can see what you are shooting photos of. In VERY cold and dry conditions, even an eyepiece viewfinder can be a problem. On one trip I did to the Alaska Range, every time I held my camera up to my eye, my viewfinder fogged from the moisture near my body. These were the coldest temperatures I have ever encountered, and it is not likely that you will see these types of conditions. To put it simply, your camera is actually better suited to working in the cold than it is in extreme heat. On hot sunny days, don't leave your camera in the car. The batteries are another story that we will discuss next.
The problems most people encounter with their camera in cold weather are only indirectly related to the cold weather and can be avoided by a few simple rules. This brings us to the second most common myth of cameras in the cold. I often hear people say they keep their camera in their jacket so it stays warm. This works great with water bottles, but is not a good thing to do with a camera. Picture walking into a warm room with glasses on after having been outside in cold weather. Glasses fog, and so will a camera the second you put it back in your warm jacket. As long as it is dry outside, keep it outside. Cold is not your cameras enemy, changes in temperature are. This moisture problem applies to the inside of your tent as well. Tents can be very moist. I keep my camera in my backpack out of the tent at night and hanging on the outside of my backpack when I am moving during the day.

Batteries
Your camera won't have any problems in the cold, but your batteries might. Batteries do not loose their power in cold weather; they are just not able to give quite as much of it up. So as soon as a battery is warmed up, it is good again. Older metal hydride and nickel cadmium batteries are not very good in cold weather. Battery technology is advancing very fast, and this has been a great thing for digital cameras. Most new camera batteries are Lithium ion. They are expensive, but they work well in the cold. If you camera uses over-the-counter AA or AAA, buy the more expensive lithium ion batteries. They will last twice as long and save you money in the long run.
If you don't want your camera to die on summit day, spend some time learning how long your batteries last. I know that given normal temperatures I can shoot all the photos I want with my Nikon SLR and spend a lot of time reviewing them and not run out of battery power for any trip three weeks or less. I carry two extra batteries just in case on Denali, and almost never carry an extra for any other trip. I have never run out of batteries with this system, but cameras vary. You should know about how many photos your camera can shoot on one battery and then subtract 30% to know what you might get in cold weather. I have seen lots of battery failures on small point and shoot cameras. I feel like more of these camera have problems than don't so be very careful which camera you buy. If you can find one that uses AA batteries that is the best option. Either way you will need to bring lots of extras on a long trip. No matter what you do make sure you have one fully charged battery for summit day. I have seen a lot of people come home with no summit photo because their battery died.
Moisture
The only time I would think about leaving my camera at home is in very rainy weather, for example, the Cascades in early spring. Even then I usually bring it along anyway. Moisture probably won't completely kill your camera, but it might. Keep your camera in a plastic bag if it is raining. Skip the long photo sessions, since they probably won't be great photos anyway. I always try to think about where the most moisture is and keep my camera somewhere else. I will remove the camera from the plastic bag quickly shoot and then return it to the bag. Sometimes I open the bag poke the lens out and leave the rest of the camera in the bag while a shoot a couple of photos. I keep my camera in the tent when I am in wet climates and outside the tent when I am in Alaska. Remember, snow is not the same as rain. It is a lot easier to keep a camera dry in the snow than the rain. If your camera ever does get wet, immediately take the battery out and do not use it for the rest of the trip. Attempt to dry it out as soon as possible by leaving it in the sun or some other warm (not hot) area. Get a bag of rice wrap the camera in cheese cloth and bury it in rice for a week. I have heard of some people putting their electronics in an oven to dry them out, but I don't suggest you try this. I just had an amusing email from a fellow guide asking for everyone's phone numbers after cooking his phone in the oven and losing all the data. Heat is one of the primary enemies of electronics.
I just returned from a trip to Antarctica where temperatures were the coldest I have ever encountered. I spent some time shooting in volcanic vents which are warm and very moist. This creates some of the most difficult conditions for shooting that exist. In order for the camera not to fog the second it is taken into the cave it must be the same temperature as the cave. The temperatures outside the cave were -20 and inside they were often above freezing (thats over a 50 degree change). I entered the cave with the camera sealed inside a ziplock bag and placed the camera on the floor (the warmest part of the cave). After finishing all my other work I then pulled the camera out to shoot photos which was sometime as much as an hour after entering the cave. This is the only way to shoot in this type of environment.
Camera Use
The most important thing about having a camera in the mountains is using it. The best thing about shooting digital photos is that it does not cost you any more to shoot more photos. You won't automatically get better photos because you shoot more on a given trip, but if you consistently take a good quantity, two things will happen. You'll accelerate your learning of what works and what doesn't work in creating quality images, and if it becomes automatic to be taking photos throughout the day or throughout a climb, you are unlikely to miss great photographic opportunities - many of which are only there briefly. Shoot away!

--Alasdair Turner, Instructor and Guide
Monday, February 23, 2015
Mountain Boot Selection
Footwear is one one of the most important gear selections we make for a trip to the mountains. Not unlike tires on your car which are the "only part that's in contact with the road " as the saying goes, boots can make or break a trip. Everyone who has spent any amount of time in the mountains has heard a tale or two about footwear gone wrong.
Recently, I was having an email conversation with a participant about what boots he should get for his trip. By the time the conversation was over I realized I had written some fairly useful information about mountain boots, that could be useful for anyone planning a trip. This blog post grew from that seed.
I use Scarpa and La Sportiva as examples here because I'm most familiar with their products. This is because they are usually the most widely available and they also fit my feet well. There are a lot of other good boot companies out there, including Kayland, Zamberlan, Asolo, Lowa, and Salewa. It's all about what fits.
"Shank" is a term that historically has referred to a metal bar running the length of the boot sole to add stiffness. "Full shank" boots are very stiff longitudinally and are appropriate for water ice and steep alpine ice climbing. "3/4 shank" boots are softer fore-to-aft and hike and climb rock better than boots with a full shank but do not climb water ice or steep alpine ice very well. These days manufacturers create that stiffness with different methods and materials, but we still use the terms to refer to the performance characteristics of the boots.
What follows is a list of the basic types of mountain boots, with pros and cons, and examples of models in italics.
Three Season: Uninsulated, 3/4 shank. Appropriate for use in the summer, on warmer
spring and fall trips depending on conditions, and on shorter/less steep
alpine ice. Very light. Climbs rock relatively well. Not very good for water ice or steep, sustained alpine ice. Compatible with strap-on and "semi-auto"
crampon bindings. The red boots changed the paradigm for this category
and led the way in current lightweight developments. La Sportiva Trango Cube, Trango S Evo (the red boots); Scarpa Charmoz Pro.
Singles:
Insulated, full shank. Appropriate for use on winter day trips and
sustained steep alpine or water ice. Can be used for winter overnights but keeping your feet dry becomes big challenge
as the trip goes on. Wet feet are cold feet. The silver boots and Rebel Pro are bending this category a bit. Both are
lighter but have a less insulation (particularly the Rebels) than other single boots. This is the sort of boot
folks are using for most winter climbing in the lower 48 and lower
altitude Canada, and for sustained summer ice in The Sierra and
Cascades. Compatible with all crampon bindings. La Sportiva Nepal Cube, Nepal Evo, Trango Extreme Evo Lt (the silver boots); Scarpa Mont Blanc, Mont Blanc Pro and Rebel Pro.
1.5 Boots:
This is a new category in the last 5 years or so. Insulated, full
shank. It's a single boot with an integrated gaiter that covers the
whole thing. Performs like a single boot, but warmer. Kind of a niche boot. Might be a bit easier to dry out on overnights.
Will keep your feet warm year-round in the lower 48 and lower altitude
Canada; and lower altitude Alaska after mid-May if you're careful. A bit
warm for lower 48 in the summer. Compatible with all crampon bindings. La Sportiva Batura; Scarpa Phantom Guide.
Recently, I was having an email conversation with a participant about what boots he should get for his trip. By the time the conversation was over I realized I had written some fairly useful information about mountain boots, that could be useful for anyone planning a trip. This blog post grew from that seed.
I use Scarpa and La Sportiva as examples here because I'm most familiar with their products. This is because they are usually the most widely available and they also fit my feet well. There are a lot of other good boot companies out there, including Kayland, Zamberlan, Asolo, Lowa, and Salewa. It's all about what fits.
"Shank" is a term that historically has referred to a metal bar running the length of the boot sole to add stiffness. "Full shank" boots are very stiff longitudinally and are appropriate for water ice and steep alpine ice climbing. "3/4 shank" boots are softer fore-to-aft and hike and climb rock better than boots with a full shank but do not climb water ice or steep alpine ice very well. These days manufacturers create that stiffness with different methods and materials, but we still use the terms to refer to the performance characteristics of the boots.
What follows is a list of the basic types of mountain boots, with pros and cons, and examples of models in italics.
 |
| A high mileage La Sportiva Trango S Evo. The "red boot" is the classic three season mountaineering boot. |
 |
| La Sportiva Trango Extreme Evo Light GTX, a single boot. |
 |
| La Sportiva Nepal Evo Women's single boot. |
 |
| The toe area of a three season boot (left) and single boot (right). Note the prominent reinforced lip or "welt" on the single boot. This is for fully automatic crampon bindings, the kind with the wire in front. All single, 1.5, and double mountain boots have a welt in the front. If your mountain boot doesn't, it's probably not great for ice climbing. |
 |
| La Sportiva Spantik, a double boot. |
Doubles: Insulated, full shank, with a removable liner. You can take the liner into your sleeping bag at night and dry it out. This lets you have dry (and therefore warm) feet day after day. Sometimes called "6000 meter boots", which refers to the sort of altitudes they're used at. Heavy. Stiff uppers don't handle rock or mixed climbing as well, though the Phantom 6000's are alright. Appropriate for really cold conditions and long trips, Alaska and higher altitude Canada. Compatible with all crampon bindings. La Sportiva Baruntse and Spantik; Scarpa Phantom 6000.
So what to get? For folks who are involved in an outdoor pursuit (climbing, backpacking, mountain and road biking, skiing and snowboarding, paddling) at any even remotely serious level the idea of a "quiver of one" for gear doesn't work. There's no perfect boot for everything, and the more things you do the more true that becomes. A pair of double boots will keep your feet warm and dry in the gnarliest conditions this continent has to offer, but wearing them on a summer ascent of Mount Rainer's Disappointment Cleaver or Forbidden Peak's West Ridge will have you hating life. On the other hand, spend a few days at a water ice crag in the lower 48 and you're bound to see some poor soul trying to climb steep ice in three season boots.
The only mountaineers who own one pair of boots are those who haven't bought their second pair yet. Climbers who own two pairs usually either own a pair of three season boots and a pair of singles, or a pair of single boots and a pair of doubles.
Fit is the most important selection criteria. Weight is criteria number 2. If gear shops near you carry several different models, rejoice. If not, several online retailers offer free return shipping. Order a few different models, wear them around the house for a week, and then decide. You can't try on too many different pairs. Aftermarket insoles (like Superfeet) can do wonders for improving fit. The liners of double boots can be thermo-formed (or "cooked") to your feet at a good ski shop, look for the most grizzled boot-fitter on staff. Some climbing shops also offer this service.
Mountaineering is a gear intensive sport. All that gear costs money. If you don't want to buy a lot of gear, you have other choices from the climbing buffet. Bouldering and sport climbing are both great ways to enjoy the vertical realm with a lot less equipment. If you still want to go mountaineering, get the right boots for your trip.
--Ian McEeleny, AAI Instructor and Guide
Saturday, February 21, 2015
Weekend Warrior - Videos to get you STOKED!!!
After the Freeride World Tour was put on hold in the wake of a nasty avalanche, they were back on track in Andorra last week. And what a track it was! Check out this winning run from New Zealander Sam Smoothy. Yes, that really is his last name, and with a name like that, there is no need for a nick-name.
Red Rock Rendezvous is just a little more than a month away, so I thought I would tempt you a bit with this great video from Paul Robinson putting up a handful of beautiful boulder problems throughout the canyons.
Unfortunately for most of us out here in the West, it has been a pretty dismal winter. If you're a skier or rider in the lower 48, you all know that all the snow is dumping pretty much everywhere east of the Mississippi, with the real hotspot right now being Vermont. Although this last video is recently released, it is actually footage from the previous season. But even that can make us envious of how good it is up in New England right now.
Have a great weekend! - James
Tuesday, February 17, 2015
Ski Guide's Training at the American Alpine Institute
 |
| Getting ready to head into the Baker backcountry (A. Stephen) |
 |
| Trying out different types of ski anchors (A. Stephen) |
 |
We practiced lowering a skier down a steep slope (A. Stephen) 
We spent some time setting up various emergency sleds, and tested their capabilities. (A. Stephen)

On Day 2, we showed up to about an inch and a half of slush in the parking lot and it was raining heavily. Avalanche conditions were high, so we adjusted our tour plan to safe slopes around artist point. Equipped with Gore-tex and multiple pairs of gloves, we set out to practice some terrain and group management skills.

Staying psyched!
 
Making turns in some fluffy slush!

Despite the difficult conditions, we had a great time!
--Andy Stephen, AAI Instructor and Guide |
Monday, February 16, 2015
AK Girls Way - In Loving Memory of Liz Daley
We lost AAI Guide and professional splitboard athlete Liz Daely in late September in an avalanche in South America...and we all still think about her all the time. Patagonia recently released this video of Liz and friends on a backcountry trip in Alaska.
Watching this not only reminds about what a wonderful person Liz was, but also what a phenomenal athlete she was...
--Jason D. Martin
Watching this not only reminds about what a wonderful person Liz was, but also what a phenomenal athlete she was...
--Jason D. Martin
Saturday, February 14, 2015
Weekend Warrior - Videos to get you STOKED!!!
It's both Valentines weekend and President's Day Weekend (and Friday the 13th as well). In case you have Monday off, or maybe you're just lounging with your sweetie, the videos I've got for this Weekend Warrior are a little longer than usual.
First off, we've got 11 minutes of Rocklands, South Africa, featuring Alex Megos and friends throwing down on some awesome bouldering.
Next up is a heartfelt tribute to JP Auclair from his friends at Alpine Initiatives and Sherpa Cinemas. JP was killed with his friend and fellow skier extraordinaire, Andreas Fransson, in an avalanche in South America in September of 2014.
Finally, our last video for this weekend is a film from POW (ProtectOurWinters.org) and SNOCRU. It's not like our normal Stoke videos, but we hope you watch it. Narrated by Conrad Anker, "Momenta" is a documentary aimed to educate, raise awareness, and activate communities to stop all proposed coal exports in the Pacific Northwest.
Have a great weekend! - James
Friday, February 13, 2015
Reintroduction of Grizzly Bears to the North Cascades
The American Alpine Institute just received the following release from North Cascades National Park:
Public Invited to Open Houses on Options for
Grizzly Bear Restoration in North Cascades Ecosystem
Public comment period open through March 26, 2015
SEDRO WOOLLEY, Wash. – The public is invited to participate in a series of informational open houses regarding restoration of grizzly bears in the North Cascades ecosystem. The meetings are being held by the National Park Service (NPS) and U.S. Fish and Wildlife Service (FWS) as part of the Grizzly Bear Restoration Environmental Impact Statement (EIS) process for the North Cascades ecosystem. This is the first opportunity for public involvement in the EIS. The purpose of the EIS is to determine whether or not the agencies will take an active role in restoring the grizzly bear to the North Cascades Ecosystem.
The public open houses will be held at these locations and times:
Winthrop March 3, 5-7:30 pm
Red Barn Upper Meeting Room
51 N. Hwy 20
Winthrop, WA 98862
Okanogan March 4, 5-7:30 pm
Okanogan PUD Meeting Room
1331 2nd Ave N
Okanogan, WA 98840
Wenatchee March 5, 6-8:30 pm
Chelan County PUD Auditorium
327 N. Wenatchee Ave.
Wenatchee, WA 98801
Cle Elum March 9, 5-7:30 pm
Putnam Centennial Center Meeting Room
719 East 3rd Street
Cle Elum, WA 98922
Seattle March 10, 5-7:30 pm
Seattle Pacific University Bertona Classroom 1
103 West Bertona
Seattle, WA 98119
Bellingham March 11, 5-7:30 pm
Bellingham Central Library Lecture Room
210 Central Avenue
Bellingham, WA 98227
In addition to these open houses, the public is invited to submit written comments at http://parkplanning.nps.gov/NCEG. Comments may also be submitted through March 26, 2015, via regular mail or hand delivery at: Superintendent’s Office, North Cascades National Park Service Complex, 810 State Route 20, Sedro Woolley, WA 98284.
“This is an important phase in the process of assessing environmental impacts,” said NPS Pacific West Regional Director Chris Lehnertz. “Public comment at this stage is critical to ensure that all issues are considered.”
The FWS listed the grizzly bear as a threatened species in the lower 48 United States in 1975. The species was listed as endangered by the state of Washington in 1980.
“The Grizzly Bear Recovery Plan calls on us to fully consider the restoration of the grizzly bear in the North Cascades, and this process will ensure we solicit the public for their input before putting any plan into action,” said FWS Pacific Regional Director Robyn Thorson. “We will continue to work with our partners to make this an open and transparent process.”
The North Cascades ecosystem encompasses 9,800 square miles in the United States and another 3,800 square miles in British Columbia, Canada. The United States portion of the ecosystem includes North Cascades National Park, Ross Lake National Recreation Area, Lake Chelan National Recreation Area, Okanogan-Wenatchee National Forest, and Mt. Baker-Snoqualmie National Forest.
A few grizzly bears have recently been sighted in the Canadian part of the ecosystem, but no grizzly bears have been sighted in the United States portion for several years.
The U.S. Forest Service and the Washington Department of Fish and Wildlife are cooperating agencies on the EIS. Funding for the EIS is provided by the NPS. The U.S. Forest Service, FWS and other cooperating agencies and partners will provide technical support throughout. For more information on grizzly bear recovery, visit http://bit.ly/NCEgrizzly or nps.gov/grizzly.
AIARE Level II Avalanche Course
 |
| The members of the AAI AIARE Level II course psyched to be out in beautiful snowy conditions! (A. Stephen) |
Over the last four days I was fortunate enough to be a student in a Level II AIARE course, taught by American Alpine Institute instructors Cliff Palmer and Richard Riquelmie. For those who don't know, AIARE (the American Institute for Avalanche Research and Education) is the foremost organization for snow education and avalanche awareness in the U.S. AIARE has designed three courses (Level I, II, and III) for backcountry travelers hoping to increase their knowledge, and improving their safety margins in avalanche terrain. Level I is focused on basic interpretations of weather data and snowpack, terrain selection, and rescue protocols. Level II begins to step into snowpack analysis, detailed weather data interpretations, heuristic factors, and multiple burial recoveries. As our instructor Richard put it, in Level II, we learn "now-casting."
 |
| Tools of the Trade: a thermometer, magnifier, and crystal card are used to gather key data points about the snowpack. (A. Stephen) |
 |
| Digging some hasty pits to quickly examine how well the new snow is bonding to existing layers on one of our snowier days (A. Stephen) |
 |
| "This is snow!" Richard explaining the properties of some freshies. (A. Stephen) |
The last day of the course it was snowing heavily and nwac.us forecasted considerable avalanche danger for the day. I had never been out on a day with considerable danger, but with Cliff and Richard's expertise and careful route selection we were able to make it to Artist Point (around 5,000 ft of elevation in the Baker backcountry), where we dug some data pits and were able to examine first-hand where the weaknesses in the snowpack were, and why considerable danger had been forecasted.
As we descended back to the cars, we were able to get a few turns in some of the best powder we had skied all year in the NW. As Cliff remarked, it may have been the best skiing we will get all year short of going to Japan! The AIARE Level II course was eye-opening, empowering, taught by two expert snow professionals, and with practice and experience, it set me up to get there one day as well. I would highly recommend any winter backcountry traveler become involved in the AIARE programs, and what better place to do it than in the (usually) epic snows of the Mt. Baker area. For a list of AIARE programs offered by AAI, click here.
 |
| A student preparing a stability test in a data pit (A. Stephen) |
--Andy Stephen, Instructor and Guide
Monday, February 9, 2015
Winter Backcountry Travel 101: Resources for Trip-Planning
 |
| Every once and awhile, the winter weather in the Cascades cooperates! (Photo: A.Stephen) |
Here in the Pacific Northwest, the weather follows no pattern. Once winter sets in, the only conditions you can really count on is low visibility and a deep, heavy snowpack. Experiencing the Cascades in winter can be an unbelievably amazing experience, and a right of passage for budding alpine climbers, but trying to figure out when the weather will allow recreational travel can be like learning another language. Fortunately, there are several online resources that will be your Rosetta Stone(TM). These are sites that I've used with much success throughout my winter (and summer!) Cascade climbing career.
NOAA
NOAA, the National Oceanic and Atmospheric Administration, is the most accurate and data-intensive site for North America. Nowhere else online will you find a more detailed 7-day forecast. If you look in the upper right-hand corner of the forecast screen, you will see elevation data for the station where the weather is reporting. This is important for recreational travel because from this measurement you can accurately decipher the average day and night-time temperature of the elevation of your intended area of travel. For every 1000' gained or lost, the temperature changes 3.3 degrees F. Also in the right hand corner, you will find a link for the '3 day history'. Click and you will find a chart of data updated every hour at the weather station closest to the area you searched for; wind speed and direction, temperature, inches of precipitation, and relative humidity. You can learn alot from this chart as a backcountry traveler. By reviewing the data from the previous 10 hours, you can learn about what the conditions are looking like in your prospective area of travel.
NWAC.US
The Northwest Avalanche Center hosts NWAC.US, which provides the coast ranges (The Cascades and Olympics) of Washington and Oregon a resource for backcountry snow conditions. Throughout winter and into early spring, NWAC.US provides a comprehensive forecast for the stability of the snowpack and avalanche danger for the region. This should be a mandatory stop in planning any winter excursion. Make sure to read the forecast discussion as well as checking the charts. While the Northwest Avalanche Center is an authority dedicated to providing awareness and accurate forecasting, it is no substitute for practical knowledge. Anyone taking trips into the backcountry in the winter should have avalanche awareness training.
Cascadeclimbers.com
If you are looking for user-based data on the Cascades, Cascadeclimbers.com is a great website. The trip reports usually provide great pictures and conditions updates and can give you a good idea of what you should be expecting out there. Cascadeclimbers.com is also a great summer resource, and it has provided me with inspiration to get out to some of the little-known areas of the Cascades. Check it out!
Turns All Year
Turns-all-year.com is a skiing-based website similar to Cascadeclimbers.com in that it is largely user-based info. They have a great trip report section, but the best part of Turns-all-year.com is the access data on the site. Access to areas in the Cascades changes frequently due to road closures and heavy winter snows, so I consider this another mandatory stop in your planning.
 |
| Warning: Nerding out on the forcasts can lead to this... (Photo: A. Stephen) |
I always check the weather at NOAA first, but then I will balance their forecast with one from another forecasting website. I commonly use wunderground.com as this second opinion. Mountain-forecast is also a great website for checking specific areas, but their database is still under development, and may not include all areas of the Cascades.
These are some great resources to help give you some confidence into traveling into the Cascades in winter. It is important to remember that these are resources that need to be paired with knowledge and experience. Don't bite off more than you can chew! As always, the American Alpine Institute is available to provide knowledge and professional instruction. Learn more about our winter programs here!
--Andy Stephen, Instructor and Guidce
Saturday, February 7, 2015
Weekend Warrior - Videos to get you STOKED!!!
"Stoked" might not be the best way to describe the two climbers in this first video, but Jon Glassberg and Chris Weidner sure had an interesting climb on the First Ascent of their new route, "Bromancing the Stone" in Red Rock.
Epic TV has put together this nice compilation of the top 9 climbs of 2014. It's a pretty face-paced set of cuts, but there's some impressive climbing in there!
Patagonia has a great video series going now called "Find_Away." It highlights climbers and skiers who are trying to break into unknown or rarely traveled terrain and push boundaries, both mentally and physically. This 5th episode features splitboarders Ryland Bell and Jeremy Jones in Ryland's "backyard" of the massive lines near Fairbanks, AK.
Have a great weekend! - James
Friday, February 6, 2015
Freeride World Tour Avalanche
By now many of you are aware that there was a serious avalanche in Kappl, Austria during a Freeride World Tour event on Tuesday. French free skier Julien Lopez set off an avalanche after taking a fall and losing a ski. He was climbing back up the deep snow when the slope released.
Lopez reacted by pulling his ABS airbag system and stayed on top of the debris as the slide ran down the mountain. The skier suffered a few minor bumps and bruises to his leg and ribs.
Lopez reacted by pulling his ABS airbag system and stayed on top of the debris as the slide ran down the mountain. The skier suffered a few minor bumps and bruises to his leg and ribs.
Here's the thing though. This mountain had been heavily controlled. The slope had been repeatedly bombed and there were guides on site checking the snowpack. But even with all of that, a layer of instability was missed and it resulted in an avalanche.
The following video shows the avalanche, what the team did to control the slope and the aftermath. The video is well worth watching...
--Jason D. Martin
Subscribe to:
Posts (Atom)

