Wednesday, February 26, 2014

Route Profile: Preparing for the BIGGER route

Not every climb can be done over the course of a long weekend. Some routes require multiple weeks on a mountain to put you in the best possible situation for success and make a push for the summit. Everything builds up to summit day. The physical training. Hours spent hiking on trails. Time spent mastering the knots. Everything adds up to be a big investment of time and resources!

While we can’t change the fact that bad weather will occasionally stop us from reaching the summit, we can alter our approach to training for big objectives by following through with a preparation process and testing all our skills and gear on a less committing route or mountain.

This is where our Denali Prep Course proves invaluable for climbers with Denali or other big mountains on their horizon. The 6-day course allows you to review what you know and learn new skills. If that piece of equipment is still shiny new, you can test all the gear you’re planning on bringing to the mountains and get direct feedback from AAI guides with experience on Denali and other big mountains around the world. We cover the big mountain and expedition skills necessary for a successful climb. After completing a Denali Prep Course, climbers perform better and contribute more to the expedition team.

See below for photos from a Denali Prep Course on Mount Baker in February!


Redistributing all the group and personal gear.
Amy Godfrey.
Stormy weather on the slopes of Mount Baker.
Mark Smith.
Practicing knots and hitches in the cook tent.
Amy Godfrey.
Preparing for glacier travel with sleds.
Mark Smith. 
Digging out tents is a daily chore.
Amy Godfrey.
Psyched for fixed line practice!
Amy Godfrey.
Interested in reviewing your skills and testing your gear before the big climb? Our guides have direct experience on Denali and provide feedback for you to perform at your best level in the mountains. Join us for a Denali Prep Course in either March or April!

-- Dylan Cembalski, Alaska Programs and 7 Summits Coordinator and Guide

Tuesday, February 25, 2014

Ice Anchors - Part II

So Part 1 showed how to make ice anchors with two screws. Part 2 will show you how to make ice anchors in more complicated scenarios. Let's get to it.

How to Make a 3-Screw Anchor

Sometimes you want an extra screw for security. It could be because the ice itself is not that strong and you want another anchor point to add to the mix. It could also be that you only have shorter screws, which can sometimes leave you wanting another piece.

The process itself is quite similar to a 2-screw anchor. Place three screws in the ice, ideally about one foot away from the others. it is best to offset the screws a bit on both vertical and horizontal planes. Clip a carabiner to each screw, and clip in your anchor material. A triple-length sling or cordalette works really well with 3-screw anchors.


And then tie your figure-8 knot. Make sure to keep the cordalette's knot (the one shown in the upper left) away from the figure-8 knot:


And clip in your master 'biner (always a locker):


How to Make a V-thread and Screw Anchor

Sometimes you may want to add in a V-thread to your anchor. I use this especially in the summer on glaciers on Mt. Baker, where we toprope for hours in the hot July sun. Screws can melt out quite quickly in this case because they conduct heat. So I'll often make a V-thread to add to an anchor. Sometimes I'll even do an anchor with two V-threads, but I'll show just one V-thread and one ice screw:


To make this anchor, do a V-thread (see a following blog for how to make V-threads) and put in a screw. Again, make the screw up and to one side of the V-thread. Clip a carabiner to each piece. Clip in your anchor material (shown is a 48" runner). Tie your figure-8 knot to create a masterpoint and clip in your master locker. Voila! A similar setup can be used to backup a V-thread for rappels. Stay tuned to the blog for more info about how to do this.

--Mike Pond, instructor and guide.

Monday, February 24, 2014

Ice Anchors - Part I

There are loads of different types of anchors, but they all use the same fundamental strategy: connect multiple, sound points of protection together to use their combined strength and redundancy to make a unified anchor. In this series, we'll look at different anchors you can make on ice. In Part 1 (the current entry) we'll do a basic 2-screw anchor. Part 2 will deal with other types of ice anchors.

I took these pictures during a recent course in Ouray, Colorado, where we practice making different types of anchors on ice. Note that these are all on water ice, not glacier ice. The two are different at times in character, but we use the same principals for anchors.

Step 1: Find a safe location with bomber ice.

Ice climbers send down some shrapnel! Make sure that you're out of the way to avoid getting hit. This usually means going to the side of an ice flow or hunkering down under an overhang.

Step 2: Find good quality ice for anchor.


Good ice is not fractured, hollow, or aerated, and is attached to whatever it's on (usually rock). It's a little difficult to describe exactly, but this part is fairly intuitive.

Step 3: Place the first screw.
Locate a place that the ice is fairly flat. If there are any protruding points of ice, feel free to use the adze or pick of your ice tool to knock them out to make the surface smooth. You'll want about a 10-inch diameter to allow the ice screw to rotate completely around. The angle of the screw should be roughly perpendicular to the surface of the ice. If anything, have it go just slightly (less than 10-degrees) downward. Drive the screw on home!


Step 4: Place the second screw.


Locate a place at least one foot away from the first screw, ideally up and to the side. Rumor has it that ice fractures along it's horizontal and vertical axes, so if you put the screw in up and to one side it should avoid that potential problem. (I have never even seen an ice screw fracture ice, let alone break it, so I cannot fortunately, say from personal experience on this one).


Step 5: Clip a carabiner to each ice screw.

I usually use wire-gate non-locking biners.

Step 6: Clip your anchor material to each biner.

You can use a double-length (48") sling, which seems to be the perfect length for ice anchors. You can, of course, use a cordelette, or triple-length sling as well.


Step 7: Tie your figure-8 knot to create a master-point.


Step 8: Attach your lockers, and belay on!

See Part 2 to see ways to make ice anchors on more complex terrain.

--Mike Pond, Instructor and Guide

Saturday, February 22, 2014

Weekend Warrior - Videos to get you STOKED!!!

A few weeks ago, Mt. Baker Ski Area hosted its 29th Annual Legendary Banked Slalom.  This low-key event gets big-time attention from some of the world's best snowboarders like Terje Haakonsen, Travis Rice, Jamie Lynn, Gigi Ruf, Lucas DeBari and many more.  Below are just a couple of the videos out there about this great event.


Wednesday, February 19, 2014

Route Profile: North Cascades Backpacking

Route Profile:  North Cascades Backpacking

The majority of our programs at AAI deal with teaching technical skills or going on bigger expeditions.  But we also realize that not everyone out there is ready to attempt a bigger objective right away.  You've got to learn to crawl before you walk, and in our case, learn to walk before you climb.

This is why we also offer a variety of introductory courses and backpacking trips through the North Cascades.  While enjoying the beautiful scenery that the area has to offer, we also teach you the basics of how to properly pack your pack, how to determine a good campsite. tips on backcountry cooking, and more.  We offer a variety of objectives and trip lengths.  You can go to our North Cascades Backpacking page to see all the options available.  And if you don't see something you like, we can come up with a customized trip for you.

Below is just one of the options available.  This this trip is 17-21 miles in length and is completed over 3 days. The route follows a high ridge with outstanding views of rugged, majestic peaks and snow covered glaciers.

Day 1: You met in Fairhaven for a gear check by your guide. You will have an opportunity to rent or buy any needed gear. Then we drive up into the mountains to a pair of high alpine lakes for an optional 4 mile hike to a retired fire lookout with a spectacular panorama of the surrounding Cascade Mountains, including Mt Baker, Mt Shuksan and the Border peaks along the US - Canada border. At our nearby trailhead, we climb 1.5 miles to a small pass at timberline. We traverse fields of anemone, aster, paintbrush and fireweed while enjoying glacier carved rock formations. Expect to cross small snowfields if the trip is before mid-August and be amazed at vibrant fall colors in September, when the blueberries are delicious. Gaining the ridge, we can check out the high point of the mountain or dip our feet in one of the many ponds.

Backpacking trip clients enjoying sunshine and
wildflowers on the North Cascades trip.
Day 2:  You awake to the fresh smell of pines and the quiet peace of the mountains. Enjoy a nutritious mountain breakfast of scrambled eggs with fresh tomatoes and sour cream or oatmeal and blueberries. We get a leisurely start exploring the alpine plateau before starting our ridge walk. You will feel like you are in the Sound of Music on the open ridge surrounded by beautiful peaks and lakes. There will be plenty of time for singing, reflecting and taking in the scenery. We follow the ridge for several miles, stopping for lunch whenever we get hungry. There are many options for scenic campsites along the ridge today and we can stop early to enjoy the views.

Relaxing at day 2 campsite admiring Mt Shuksan.
Day 3: Continuing along the ridge, the views of Mt Baker change from the northeast face to the north and northeast flanks. Other mountains come into view as we follow a well maintained National Forest trail. We will have a chance to have lunch on top of Mt Excelsior before heading down into the forest and our ride back.

Mt Baker impresses the high ridge hiker over fall colors.


Photos courtesy of Jeff Reis.


Saturday, February 15, 2014

Weekend Warrior - Videos to get you STOKED!!!

Alex Honnold has cemented himself as one of best climbers in the world not just because of what he climbs, but how he climbs:  solo.  For Alex, soloing is the purest form of climbing:  no ropes, no harnesses, no partners, no one to rely on.  It is just himself and the rock (and now due to his fame, usually a camera-man or two...).  We've seen Alex locked in a solid fist jam high above the deck, and as a fellow climber, I can say, "Ok, that's a solid hold.  I can reason with this."  But in his latest feat, Alex high on El Sendero Luminoso in El Potrero Chico, Mexico, and creeping along on tiny edges and crimpers!  This video of his hardest solo yet will leave your palms sweating.  Better chalk up before watching this.


In keeping in the theme, you had better chalk up for his one as well.  A couple of daredevils decided to hop the fence and climb the world's second highest building, the 650m tall Shanghi Tower, while it is still in the middle of being constructed!


So these first two videos are enough to push the limits of a seasoned climber.  But it is also interesting to take a step back and see how the average joe regards climbing.  This clip is from a CBS piece on Tommy and Becca Caldwell and life on a portaledge.


Have a great weekend! - James

Friday, February 14, 2014

Leavenworth and Stevens Pass Avalanche Course

Last week I worked another avalanche course for the American Alpine Institute. This turned out to be a great weekend and a great location for an avalanche course since there was some instability in the snow pack. We were able to view some of the instabilities and find some great snow for a nice ski tour. Some photos of the weekend are below.


A thin layer of buried surface hoar is located about 40cm below the surface in many parts of the Cascades. 


A close up of the crystals.


Skiing the trees


Skiing the trees.


--Alasdair Turner, Instructor and Guide

Wednesday, February 12, 2014

Route Profile: Joshua Tree's Dappled Mare

Route:  Dappled Mare -- 5.8, 3 pitches

Area:  Joshua Tree National Park, CA

Season: October -- May


Climber's pick the right parking spot in J-Tree.  Seth Hobby.
Joshua Tree National park came to light as a real climbing destination decades after Yosemite climbers began to migrate there to avoid the snowy Sierra Winters in the late 1950s and 1960s.  At the time, the Park was considered a great place to bide your time while bad weather kept you off the big walls; this attitude persisted through the early 1970s, when the first climbing J-Tree climbing guide was published.  In the ensuing decades, the park has become a classic winter retreat for climbers of all abilities, and one of the most highly regarded climbing areas in the world.  Visitors to the area are struck by the confluence of Southern California weather, convenient camping, and the high desert landscape, which combine in a breathtaking tableau worthy of time and exploration.

A climber moves up Old Woman Rock, catching
the evening's last sun. Ted Ullman.

From October through May, Joshua Tree’s balmy weather and vast climbing potential draw visitors from their tents out amidst the rock.   Literally thousands of routes are scattered across the landscape of massive boulders and outcroppings, where vast potential for new routes still awaits the ambitious climber. Most of the rock features in the park that climbers favor are composed of crystalline quartzite, the granitic qualities of which turn steep, daunting faces into high-friction playgrounds.  Impossible looking face climbs often turn out to be veritable walk-ups, and the intimidating shallow and flaring cracks of the Park turn out to offer reliably good gear placements for beginning and seasoned climbers alike.

A climber takes advantage of J-Tree's rock to move
up a steep face.  Katy Pfannnstein.
With so much fantastic climbing to be done in one area, the benchmark for routes making the ‘tick-list’ is remarkably high.  Dappled Mare, a 5.8 route on the Lost Horse Wall, makes the cut as one of our favorite routes in the entire park.  The Lost Horse Wall is one of the largest features in the park, and is a great place to be on cooler winter days, with its Southwest orientation and afternoon sun.  Dappled Mare is a full three pitches of excellent climbing, leaving the ground near the center of the formation.  A healthy mix of mid-sized nuts and cams, up to 2.5”, will see you through several fun crack systems and some excellent face moves.  A short walk off to the right will return you to the base of climb, and you'll be on your way to the next formation that catches your eye.


AAI employee Dyan Padagas looks for her placement
while on lead.  Dyan Padagas.
If Joshua Tree sounds like an area you'd like to explore or a place you'd like to push the limits of your climbing, come down and join us for a course or a few days of private guiding this winter.  With courses ranging from our intensive introductory course, Outdoor Rock Camp, to Learn to Lead courses for climbers looking to move into multi-pitch terrain, there’s no better way to push your climbing than joining us for some winter sun.

--Casey O'Brien, American Southwest and Foreign Programs coordinator

Monday, February 10, 2014

How to Choose a Single Rope

There are three categories for dynamic climbing ropes. A dynamic climbing rope is designed to hold a fall, and stretches accordingly. The UIAA (International Mountaineering and Climbing Federation) certifies three dynamic rope types, Single, Half (also referred to as double) and Twin. A single rope is designed to be used by itself. A half (or double) rope is designed to be used in conjunction with another double rope, where each rope is to be alternately clipped into a point of protection, each rope being treated as a single rope. A twin rope is used with another twin rope, and the two ropes are thought of and used as one, meaning both ropes are clipped into each piece of protection.

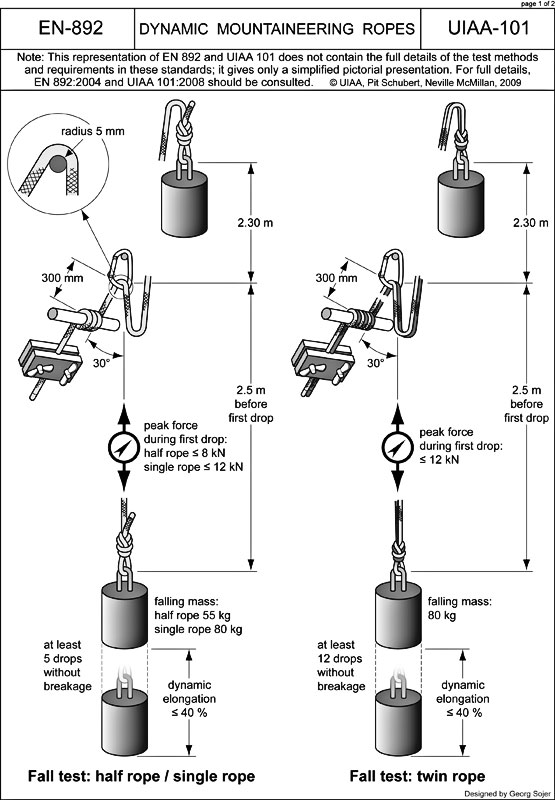
Single Ropes -


The UIAA tests a single rope by subjecting it to test falls in which the rope must arrest an 80kg weight falling from 2.30m above a carabiner at least five times, with a 5 minute rest interval between each drop test. There are other criteria tested as well. See images below.


All that is to say that more or less a single rope should be plenty strong to fall onto. So, what criteria should you focus on when buying a rope? Well here is a list of things to consider.

Obviously the first thing would be color. A rope is a personal statement, so the color should match your personality. Also, everyone knows that red ropes are stronger and allow you to climb harder than blue ropes.

In all seriousness though, here is what I look for in a single rope, generally but not necessarily in this order.

Diameter - This is what I use to narrow down choices in a single rope, since there are many on the market today. By today’s standards, a 10mm diameter rope is a great “first” rope; it will survive many days of top roping, and is more durable than skinnier ropes. This is also its weakness, as it will inherently be heavier than a skinny rope and will weigh you down for your hardest “send”. Ropes in the 9.5-9.8mm diameter range are considered today to be more of an all-around rope, meaning they will provide a good service life for a variety of types of climbing, be it top roping, sport climbing, or trad routes. I’ve logged many pitches on a 9.7 and consider it to be a great balance of weight and durability. Ropes under the 9.5mm range are fine, but you need to consider where you will be using it. A 9.2mm rope is not the best option for toprope sessions. Currently the skinniest single rated rope is the Mammut 8.7 Serenity, which is definitely not a rope you will get as much life out of as a mid 9mm rope. As such Mammut recommends this rope for “sportsclimbing” and “competition climbing” A single rope this slim is best for your hardest red point attempt, or a super light alpine cord, that you know will not last as long as a larger diameter rope. In general a larger diameter rope will stand up to wear and tear better due to surface area. A larger diameter rope has more surface area which means that it will resist abrasion better, in particular I’m referring to the rope running over an abrasive surface like the rock found in Joshua Tree or the Wind River Range.

Sheath Mass and/or Diameter - This is essentially how thick the sheath is. Different manufacturers will use one of these two terms. Bluewater Ropes for example uses the term “sheath mass” percentage, which for their Lightning Pro 9.7 single rope is 36%, meaning 36% of the ropes diameter is comprised of sheath. Mammut on the other hand uses the term “proportion of sheath mass per cent” which means the same exact thing, and on the 8.7 Serenity rope is 38% for example. Generally speaking, the thicker the sheath of a rope, the more durable it will be.

Impact Force - This is the force exerted upon a body in the event of a fall. All single ropes must fall underneath the 12kN impact force threshold to be certified by the UIAA. Ropes with a lower impact force rating will generally give a “softer catch”, and therefore theoretically exert a lower force on the piece(s) of protection holding a fall.

Weight - The weight of a rope is related to its diameter, but it is something to consider if you have narrowed down your choices to a specific diameter. Each manufacturer usually lists the weight in grams per meter or g/m. There are differences here for a specific diameter of single rope, due to variations in weave, sheath and core thickness, material specs, etc.

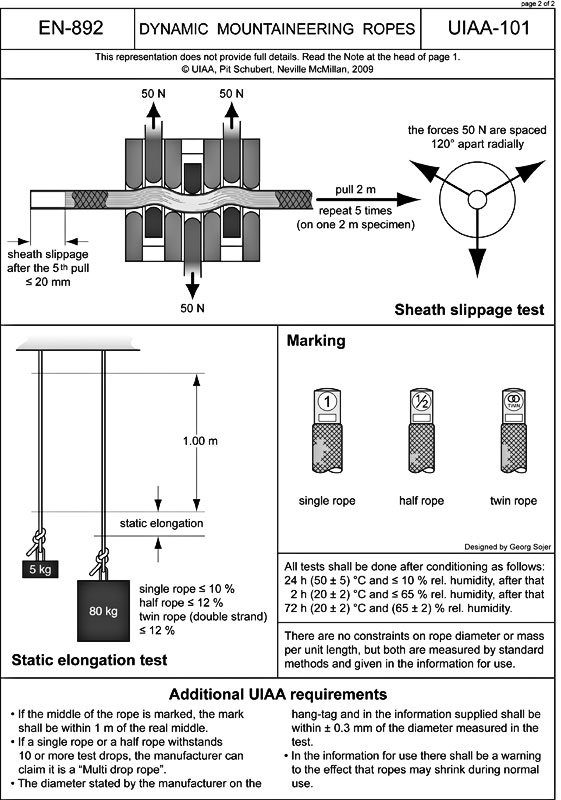
Number of Falls held - As stated above, all single ropes you can purchase have to meet the five falls held...at minimum. I don’t consider the number of falls held as high on the list because I don’t think it is as important to consider in the real world. Remember, this number is based on the specific UIAA fall test, in a laboratory setting. Skinnier single ropes will hold less falls, while larger diameter single ropes will hold more. For example the Bluewater 10.5mm Accelerator held 11 drop test falls before breaking while the Mammut 8.7 Serenity held the minimum of 5. When comparing ropes of the same diameter however, I will take this number into my overall consideration.There are other criteria such as static and dynamic elongation, and sheath slippage, but I personally value those rather low in importance.

More important than elongation and sheath slippage I believe is the “hand” of a rope. You cannot get a sense of a rope’s hand or handling characteristics without actually physically picking it up and using it. You can get a relative sense of a ropes handling characteristics in a store simply by bending it into a bight any trying to tie a clove hitch or figure eight. Some ropes are very stiff, which will soften over time to varying degrees. Others are very soft out of the package, and only become softer over time. I try and find a rope somewhere in between since I end up tying and untying knots and hitches often, and I like a good balance between stiff and soft ropes. I’ve used ropes that required more energy to tie a clove hitch into because it was so stiff, and this also requires more energy to belay a follower in autoblock mode. On the other end of the spectrum, I’ve used ropes that were very soft out of the package, and flattened out a bit over time, and while this rope had good handling, it’s overall lifespan seemed short, perhaps due to a looser sheath.

Finally once you’ve narrowed down to the model and diameter of rope you need to consider a few other things.

Length - depending on where you are climbing, you may want a shorter or longer rope. Today 60 meter ropes are the norm whereas 15-20 years ago it was 50m ropes. Depending on where you are climbing, you may want something shorter or longer. There are alpine routes where a 40m rope is plenty long enough and endurance sport routes where an 80m rope is required. Guidebooks will usually give you some indication of what length of rope is preferred for a certain area. Supertopo guidebooks for example usually give route descriptions for using a 50m rope.

Bi-Pattern or Middle Mark - I think a bi-pattern rope is almost always worth the extra cost. When a rappel route is setup for 30m rappels, and you have a 60m bi-pattern rope, life is pretty good. A bi-pattern rope has a sheath pattern change at the midway point (you should always double check this beforehand before blindly trusting it) making it really easy to find the middle of the rope even if it is super dirty as it can often become in sandy desert environments. A rope that just has a black middle marker will become more problematic to find the middle as the rope picks up more dust and the middle marker fades into the dirt as it eventually does. The downside to a bi-pattern rope is that once an end is cut, the pattern change is no longer accurate, and you either need to make a middle mark yourself, or just deal with setting up a rappel while keeping track of both ends of the rope to make sure you have found the middle of the rope

Dry Treatment - A dry treatment for a rope is basically a water resistant coating on the fibers. Most manufacturers claim differences but generally they all seek the same goal, which is to keep the rope drier in a wet environment and to lower a ropes absorption of water, which will reduce the ropes stretch and weaken it. It is good to note however that there is no magic treatment that will keep a rope dry in all conditiona and that eventually any rope will become soaked through in the right conditions.I think a dry treated rope is worth the extra cost because of a potentially longer lifespan and more peace of mind for the unexpected rainstorm. If you are going to ice climb with your rope, a dry treated rope is must. Ropes that have a dry treatment to both the core and sheath will resist water better than ropes that just have the sheath dry treated.

--Jared Drapala, Instructor and Guide

Wednesday, February 5, 2014

Beautiful Sunset in the Cascades

We've been enjoying great sunsets this week in the Cascades. This shot was taken last night by good friend and professional photographer Keith Gunnar from his home on Whidbey Island, Washington.

The image is looking across the inland waters of Puget Sound to some of the smaller peaks on the western fringe of the North Cascades, the Baring, Merchant, and Gunn Peak groups.

Skiing and climbing have both been excellent this week and should be next week too with more snow on the way. A Denali Prep course heads out on Sunday morning, and the team should have Denali-like conditions..

Last night's low on the summit of Mt. Baker was 4°F, but tonight it will move down into negative numbers.

The Baring, Merchant, and Gunn Peak groups from Whidbey Island

Whitehorse

Three Fingers

Tuesday, February 4, 2014

AAI Avalanche Course

The last couple of weekends have been spent teaching avalanche courses for the American Alpine Institute. Although the snow pack has been a little boring, the weather has been great and it has made for some great courses. Below are a few photos of the last two trips.


 Early morning skiing in some nice light.

Route finding and some wet surface conditions.


Although most of the snow was pretty solid, Small areas of instability were found. Here we conduct compression tests on the snow.

Failure layers in the first 20cm.


Time to ski.


A little route finding practice.

South slopes with lots of sun showed evidence of recent slides.

Skinning to find good snow.

Good snow had been located.

--Alasdair Turner, Instructor and Guide