Case #1
Check out this tree anchor:

Okay so the first two are a review from last lesson about what not to do. Can you see what the problem is? No redundancy! About the tree: one solid tree like this is fine, actually, especially when it's frozen in place. Trees like this can be super strong (if they're alive of course), and when the ground freezes them in place, they're bomber. There is a cordalette girth hitched - not tied - around the tree. And, to compound this, there is only a single locking carabiner connecting the cord to the rope. Yikes! This climber should have tied the cordalette around the tree with a standard figure-8 on a bight and clipped two opposite and opposed locking carabiners to the masterpoint, and clipped the rope to the lockers.
It appears that this person may have girth hitched the cord (instead of tying it like I just mentioned) to be able to extend the length of the cord to reach the edge of the cliff. A better way to this is to either use a longer piece of material (cordalette, webbing or static rope). There are other ways, too, but that's the simplest.
Case #2
This one should be a breeze:

Yep, no redundancy again. I hope you're getting good at this theme! Simply putting a second locker is all this anchor needs. Note that there are two different materials (a blue cord and a yellow sling) to make this anchor. That's fine, as long as the anchor is still SRENE, which this one is.
Case #3: The American Death Triangle

The good old American Death Triangle. I'm not really sure why it's American, but it sure is deathly. A little background on the above anchor: There are two solid bolts, each clipped with a non-locking biner. So far so good. But - the climber clipped in their cord and making the American Death Triangle. Instead, what should have been done is to pull the cord through in between the bolts, to make a redundant anchor that does not create extra forces. For more info on the American Death Triangle, click here.
Case #4: Some Crazy Guy!!


This fellow is doing a very creative (read: wrong) anchor setup.
Problem #1: He is top-belaying his partner off of his harness with an ATC in regular belay mode. If his partner falls, it will pull directly onto the pictured belayer's harness and in a downward direction. This will be uncomfortable at best, and quite dangerous at its worst. It could pull the belayer off of his feet! This is bad, especially because of...
Problem #2: He's not anchored in correctly! It's difficult to see (and even when you can see, it's hard to figure it out.) Here's a closeup:

You can see that there are two anchor ropes coming in (You only need one, by the way). Each is attached to a solid tree (that's ok), but come into be tied off to the gold-colored locker that IS ON THE BELAY LINE. What?! He should tie the anchor line directly to his harness. The locker can be clipped right into his belay loop or tie-in points. Double yikes!
Case 5: Bad Directional

Wait, where's the anchor? Check this one out! The anchor itself is just fine. But look at the directional that is placed:
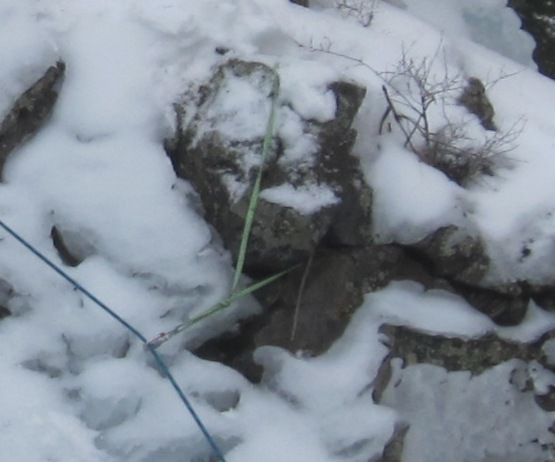
Their directional is a loose block! Major yikes. Luckily these climbers didn't detach the death block. If they did... I don't even want to think about it. Solution: use only SOLID anchor points and directionals. Never put a piece behind a loose block or tie off a loose block, even if it looks frozen in plae by an inch of snow.
Well, I hoped you learned something. Til next time!
--Mike Pond, instructor and guide.


No comments:
Post a Comment